Text Content
General Information on Texts
- Text passages in a different language are appropriately marked.
- Text can be magnified to 200% without loss of content and functionality.
- Text spacing is adjustable without loss of content and functionality.
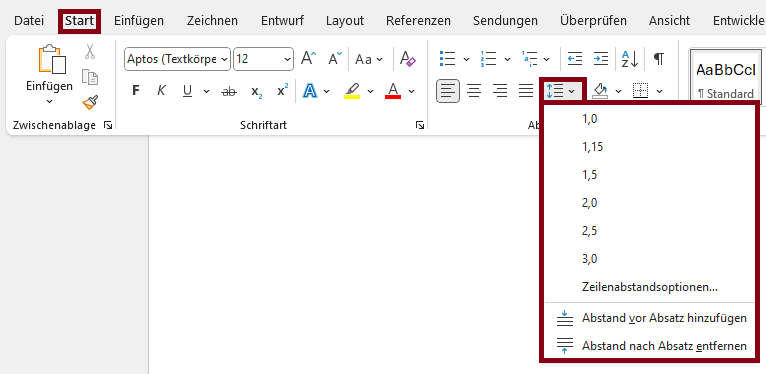
Text sections in other languages need to be tagged so that screen readers can pronounce them correctly. Visually impaired people can also improve the readability of text by using tools to adjust the spacing between lines, paragraphs, characters and words. Although this requires more space, text should be displayed in full.
Markup of Texts
-
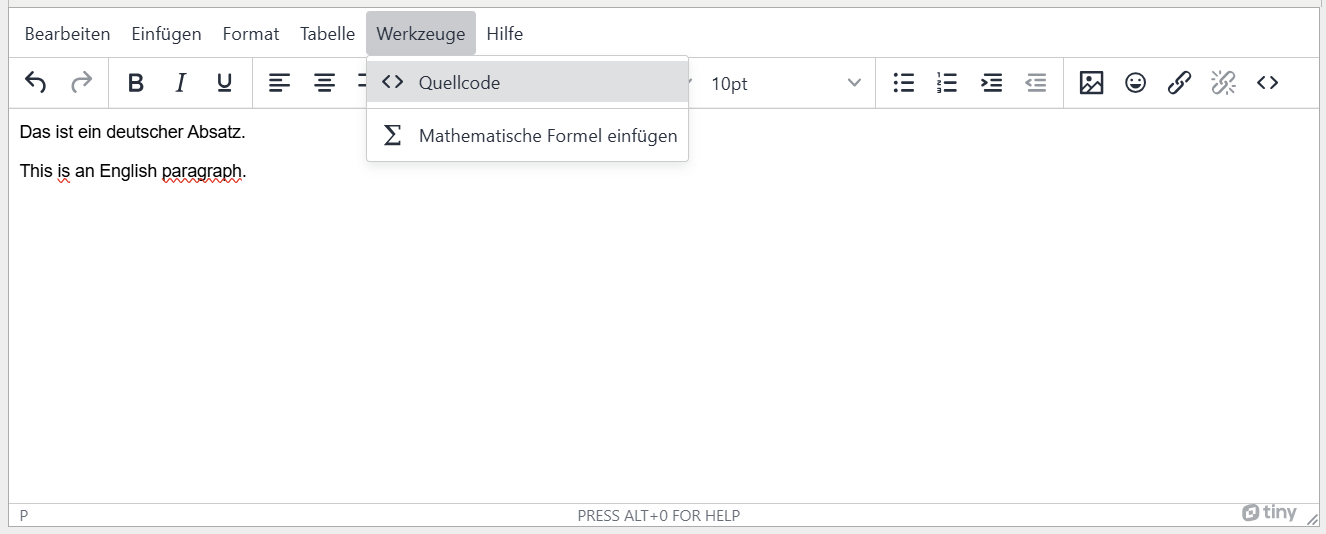
Where available, select the following: Menu: Tools > Source code
-
Add lang='language abbreviation' in the <p> tag of the text section which is not in the main language of the document.
                <p lang="de">Das ist ein deutscher Absatz.</p>
                <p lang="en">This is an English paragraph.</p>
BITV-Guidelines
- No text sections in other languages are used.
Text sections in other languages need to be tagged so that screen readers can pronounce them correctly. Visually impaired people can also improve the readability of text by using tools to adjust the spacing between lines, paragraphs, characters and words. Although this requires more space, text should be displayed in full.
It is not possible to markup text in other languages using the Ilias page editor. Text sections in other languages should therefore be avoided if people with screen readers are using the course.
- The presentation has a document title.
- The document language is specified.
- Text passages in a different language are appropriately marked.
- A slide layout is used for the placement of content.
- The reading order of slide contents is correct.
Give your presentation a document title. Also specify the document language so that assistive technologies such as screen readers select the correct pronunciation. For the same reason, text sections in other languages must be labeled with the correct language.
Use the slide layouts provided to position your content. This is the only way to ensure that the slide headings are correctly labeled. Also avoid using blank lines to place the content, as these are also read out by screen readers.
The order in which screen readers read out the slide content does not automatically correspond to the visible order. Check this order using the accessibility checker.
Realization of the criteria
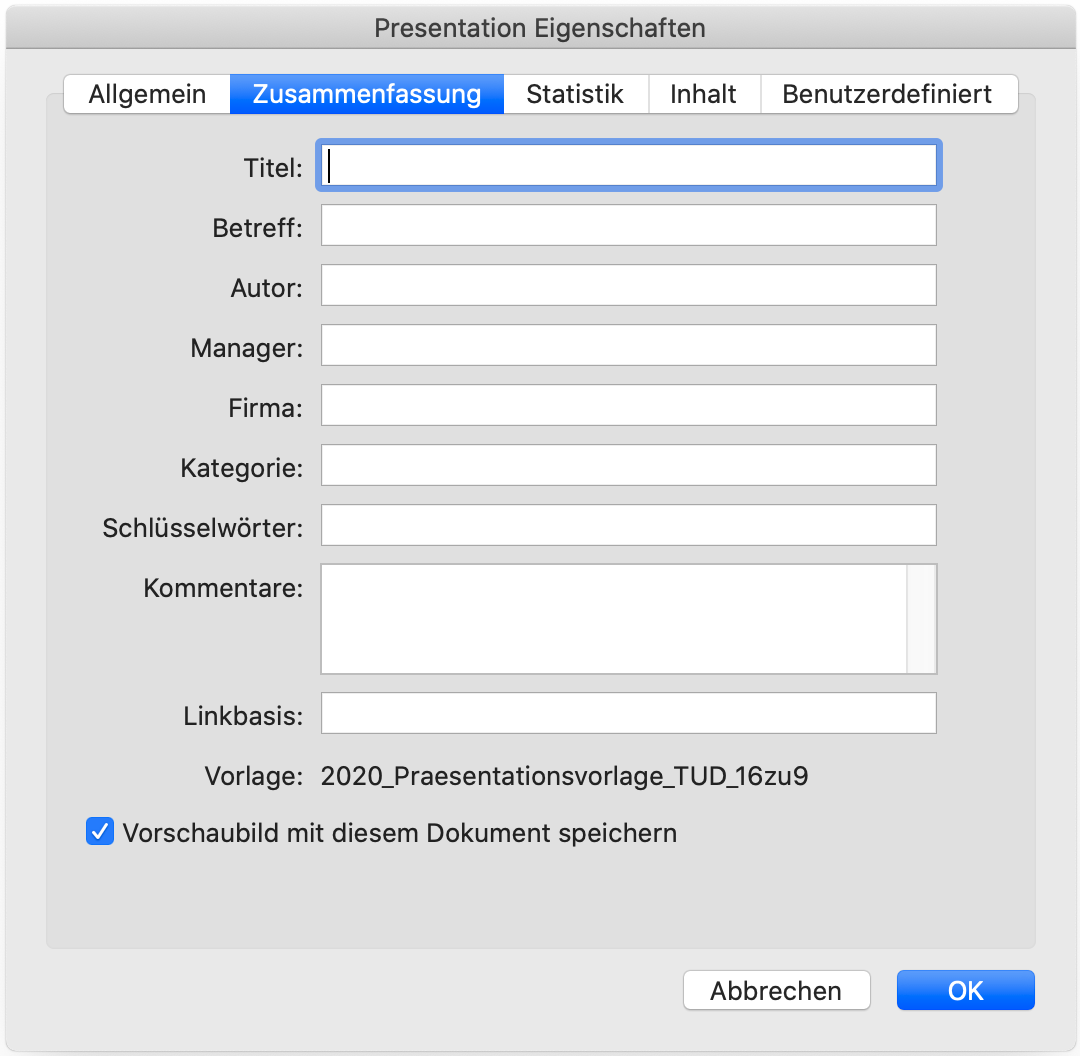
Specification of the title
-
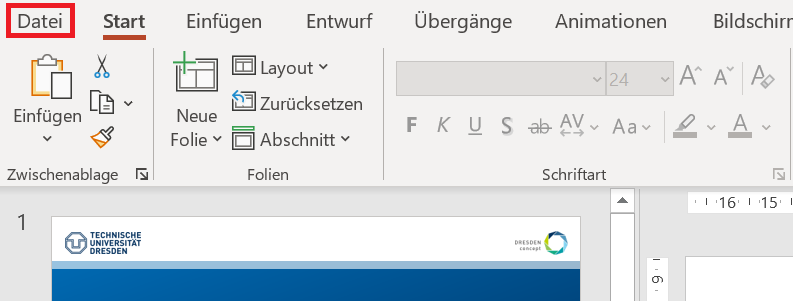
Go to "File" in the menu bar.
-
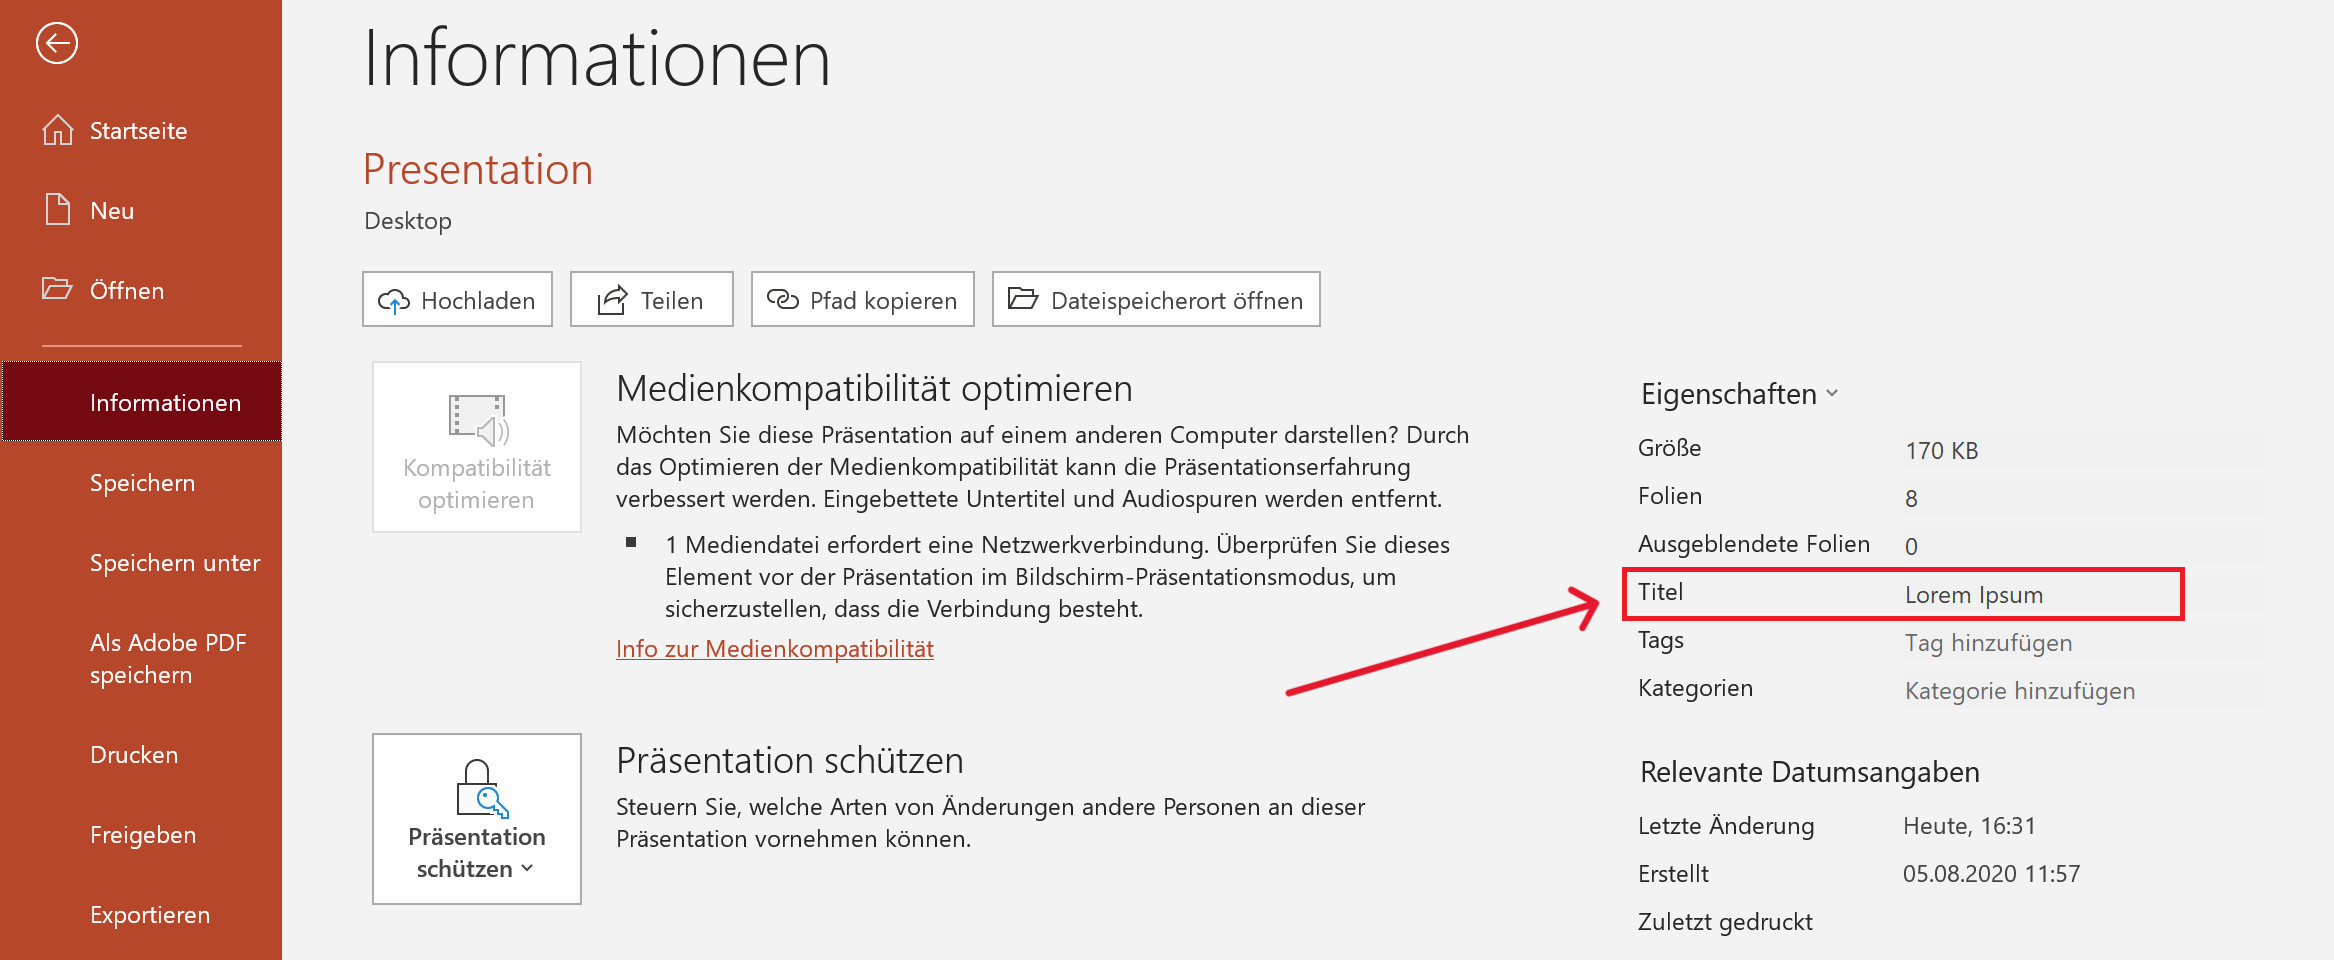
Go to "Info". You can specify the title under "Properties".
Specification of the title
-
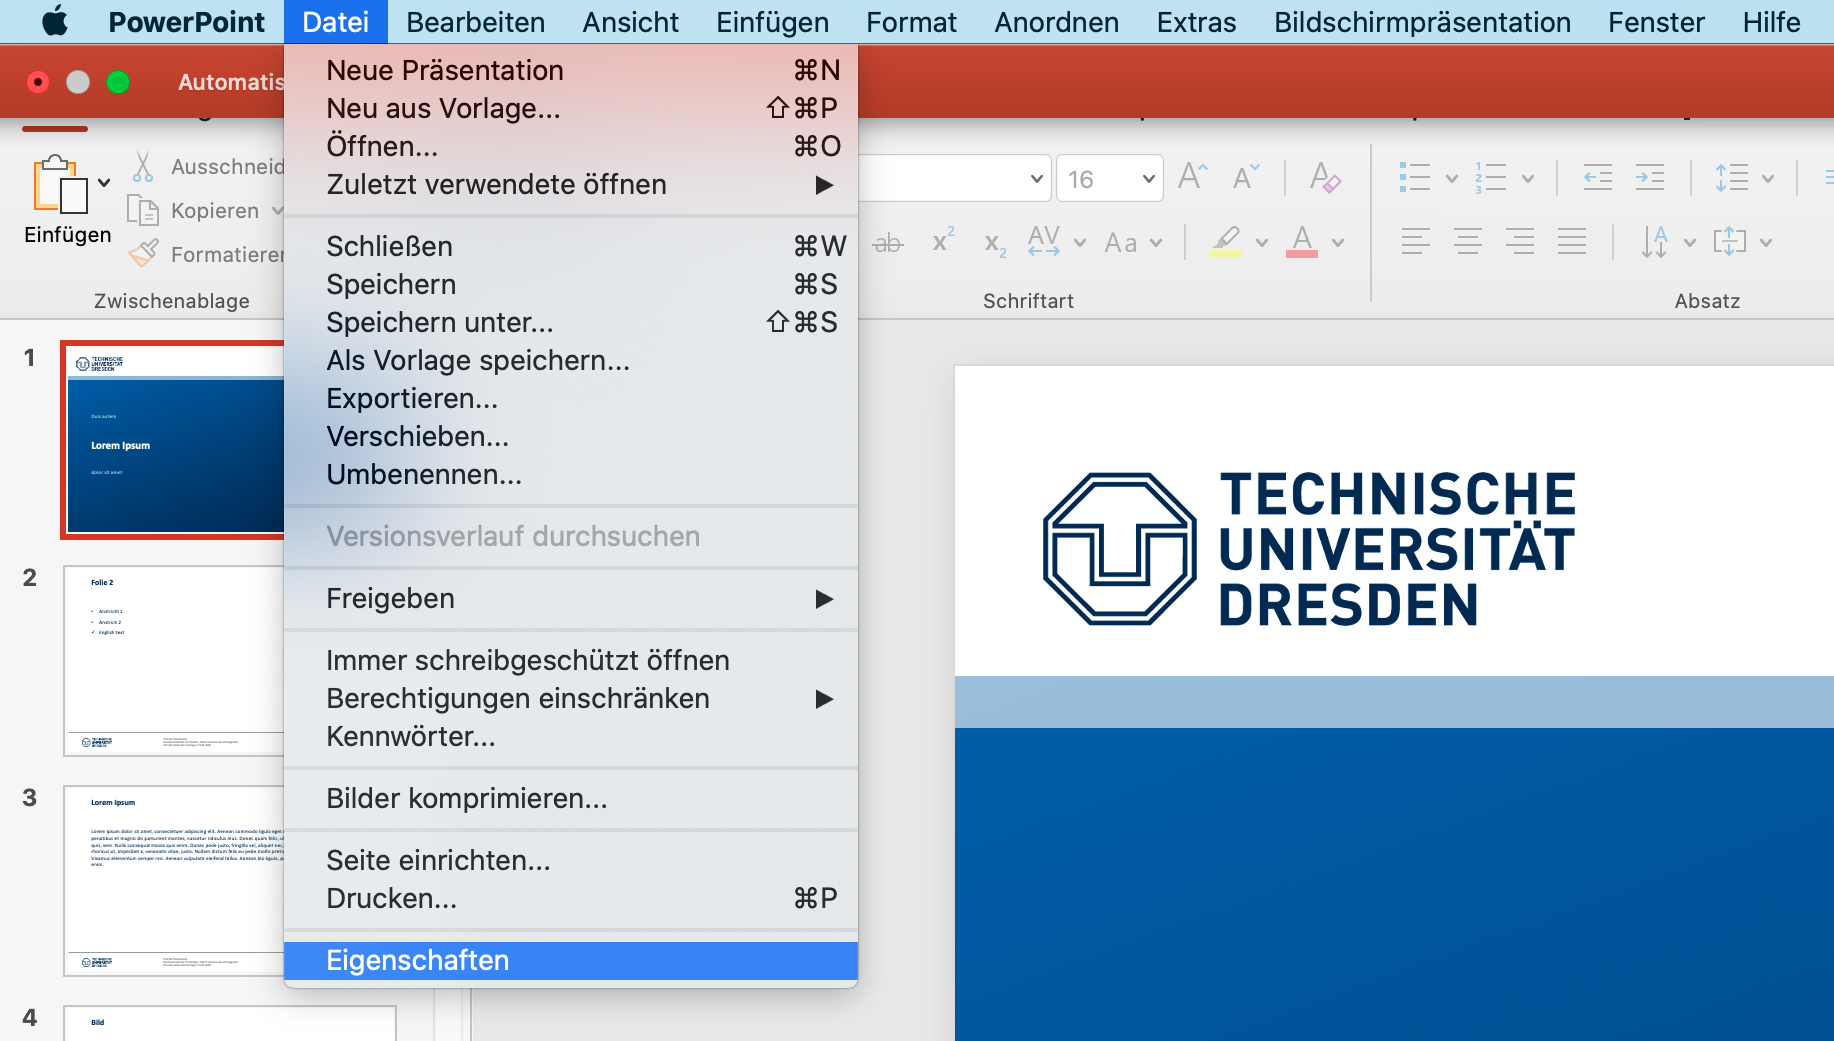
Menu bar: File > Properties
-
Go to "Info" and add title.
Specifying the language
-
You will find the current language at the bottom left-hand edge. To mark words in other languages, select them and then click on the language displayed at the bottom left-hand edge.

-
Select the appropriate language and the desired scope of the change (document, slide or selected text).

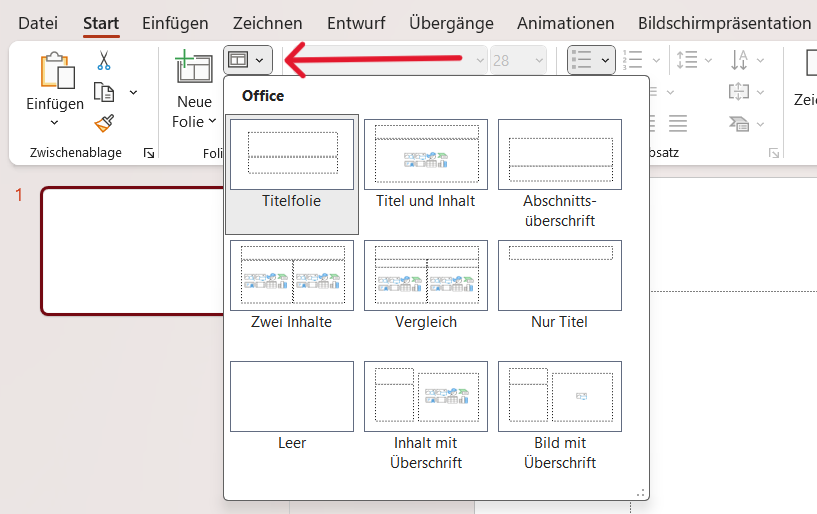
Use of slide layout
-
Menu bar: Home > Slides > Slide Layout
-
You can personalize the layout in the slide master: View > Master Views > Slide Master

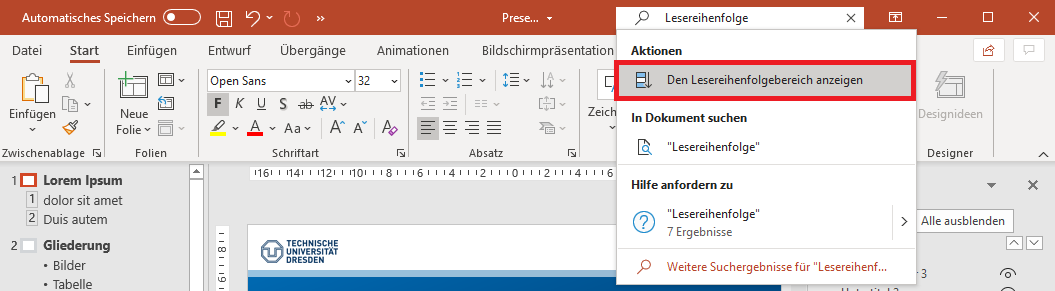
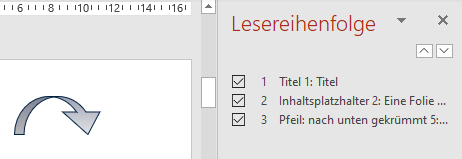
Checking the reading order
-
Search bar: "Reading order" > Display the Reading Order Pane
-
Correct the order if necessary.
Additional Information
BITV-Guidelines
- Text passages in a different language are appropriately marked.
- Text can be magnified to 200% without loss of content and functionality.
- Text spacing is adjustable without loss of content and functionality.
Text sections in other languages need to be tagged so that screen readers can pronounce them correctly. Visually impaired people can also improve the readability of text by using tools to adjust the spacing between lines, paragraphs, characters and words. Although this requires more space, text should be displayed in full.
Markup of Texts
                    <p lang="de">Das ist ein deutscher Absatz.</p>
                    <p lang="en">This is an English paragraph.</p>
BITV-Guidelines
- Text passages in a different language are appropriately marked.
- Text can be magnified to 200% without loss of content and functionality.
- Text spacing is adjustable without loss of content and functionality.
Text sections in other languages need to be tagged so that screen readers can pronounce them correctly. Visually impaired people can also improve the readability of text by using tools to adjust the spacing between lines, paragraphs, characters and words. Although this requires more space, text should be displayed in full.
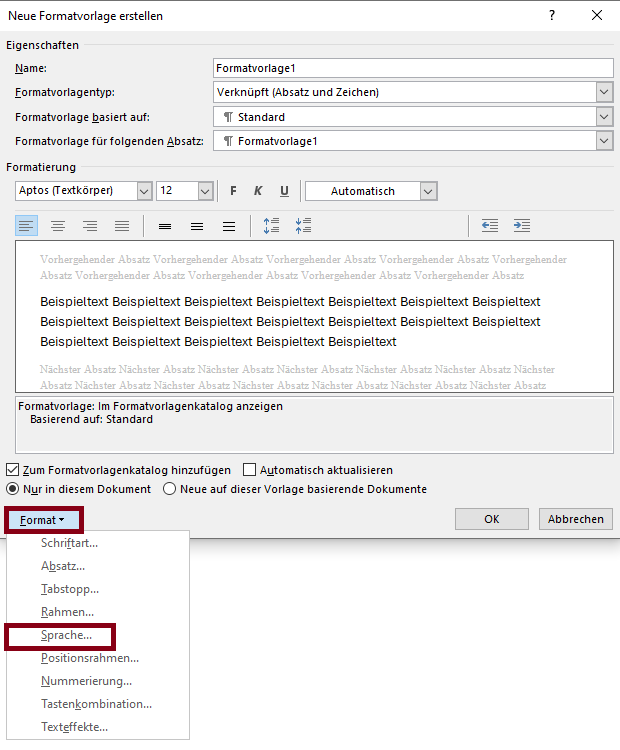
Markup of Texts
- Click “Language” in the status bar.

- Select the appropriate language for “Current Document”.

- Click “Language” in the status bar.

- Select the appropriate language for “Current Document”.
- Text passages in a different language are appropriately marked.
- Text can be magnified to 200% without loss of content and functionality.
- Text spacing is adjustable without loss of content and functionality.
Text sections in other languages need to be tagged so that screen readers can pronounce them correctly. Visually impaired people can also improve the readability of text by using tools to adjust the spacing between lines, paragraphs, characters and words. Although this requires more space, text should be displayed in full.
Markup of Texts
\DocumentMetadata{}
                    \DocumentMetadata{
                      lang = <...>,
                      pdfversion = 1.7,
                      pdfstandard = ua-1,
                    }
\documentclass[12pt]{…}
\renewcommand{\baselinestretch}{1.5}
BITV-Guidelines
Text Content
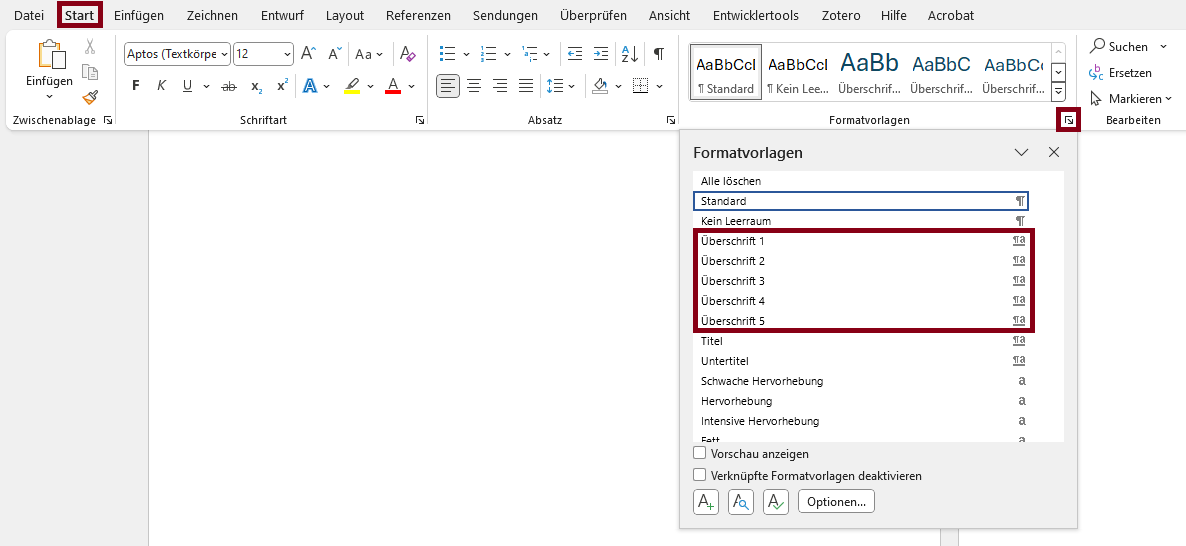
- Headings are labeled with appropriate tags, nested correctly acording to the heading levels and describe the following content.
Headings are used to structure content: related paragraphs are grouped and the content is easily manageable. Users who cannot see a purely visual distinction between headings and other texts depend on the structure being accessible independently of the presentation. By using headline elements, these can not only be interpreted as such by assistance systems (e.g. screen readers), tables of contents can also be generated and the presentation can be adapted to special needs.
Nesting
proper nesting to group content- Heading 1
- Heading 2
- Heading 3
- ...
- Heading 2
Markup of Headings
- Headings are labeled with appropriate tags, nested correctly acording to the heading levels and describe the following content.
Headings are used to structure content: related paragraphs are grouped and the content is easily manageable. Users who cannot see a purely visual distinction between headings and other texts depend on the structure being accessible independently of the presentation. By using headline elements, these can not only be interpreted as such by assistance systems (e.g. screen readers), tables of contents can also be generated and the presentation can be adapted to special needs.
Nesting
proper nesting to group content- Heading 1
- Heading 2
- Heading 3
- ...
- Heading 2
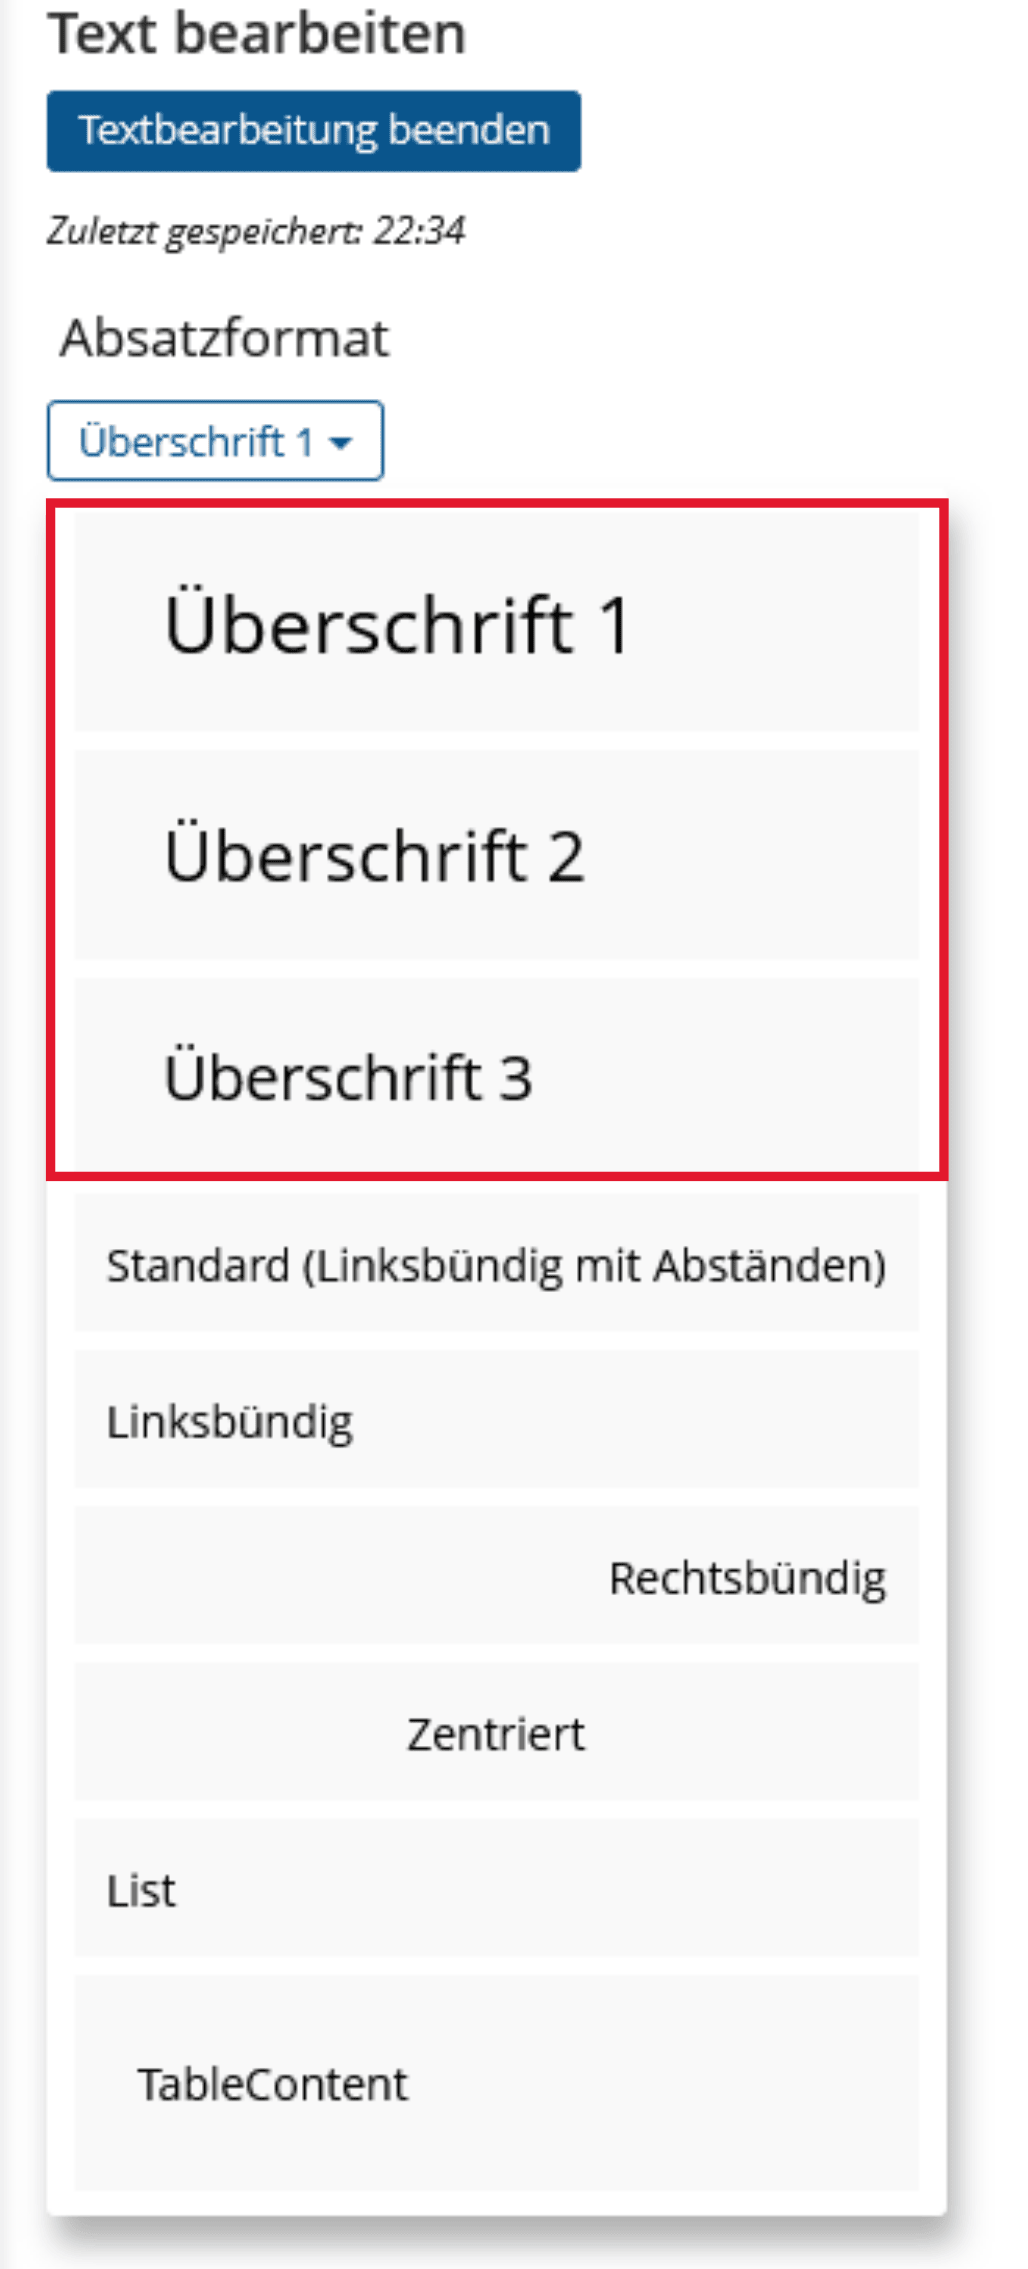
Insert Headings
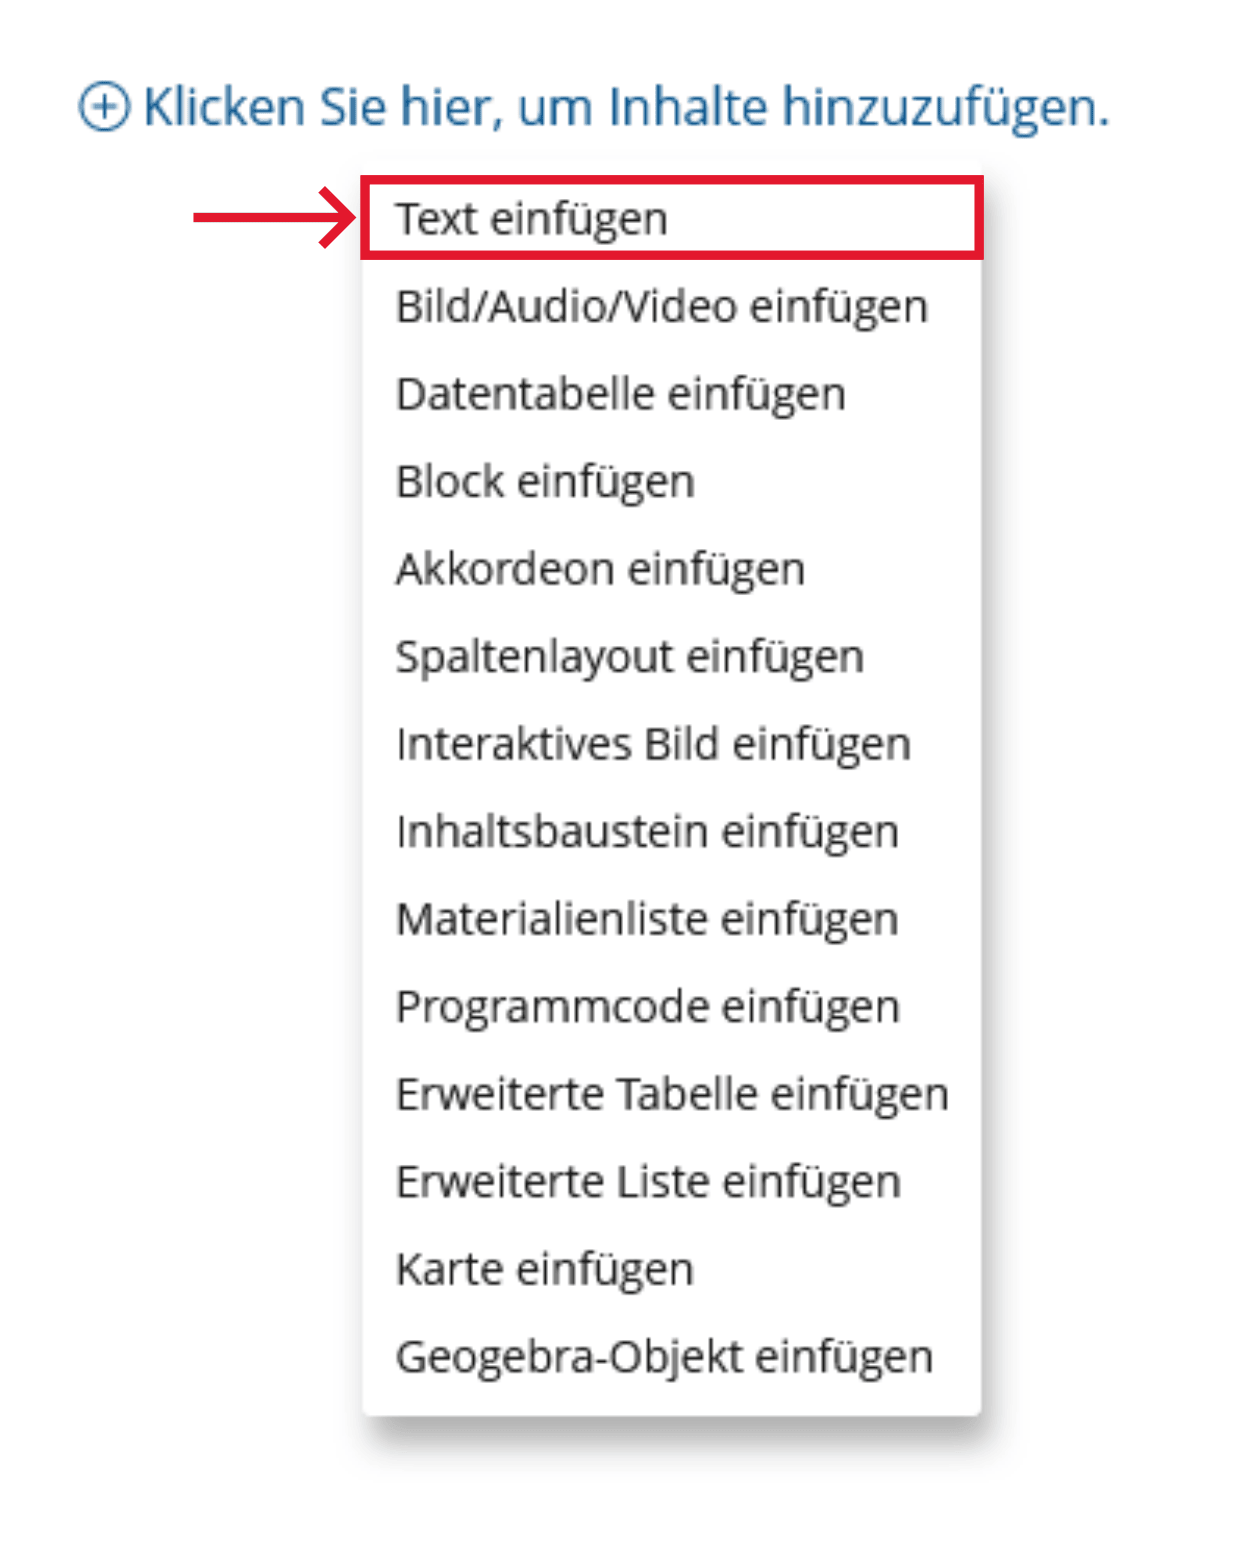
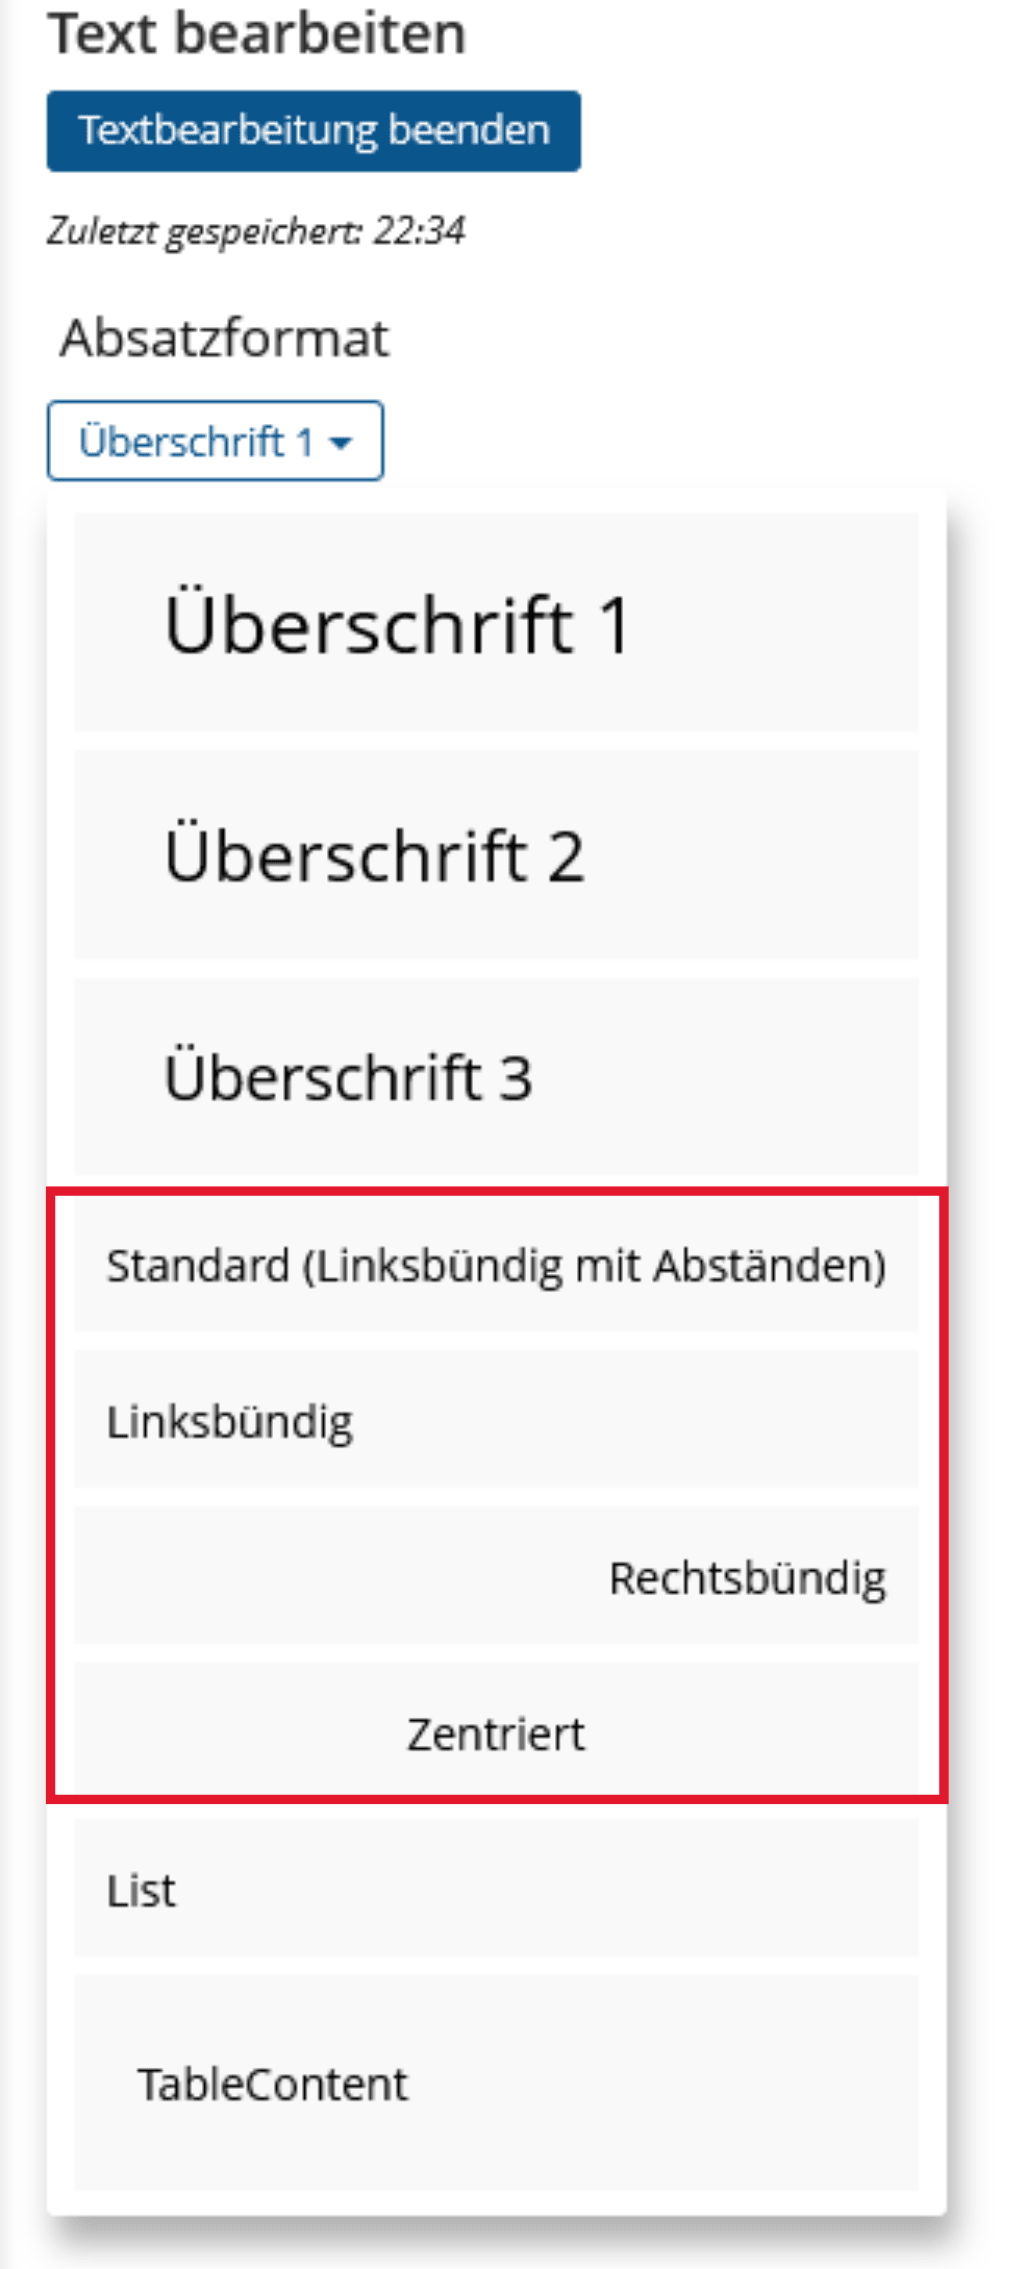
-
Click the plus sign and choose "Insert Text".
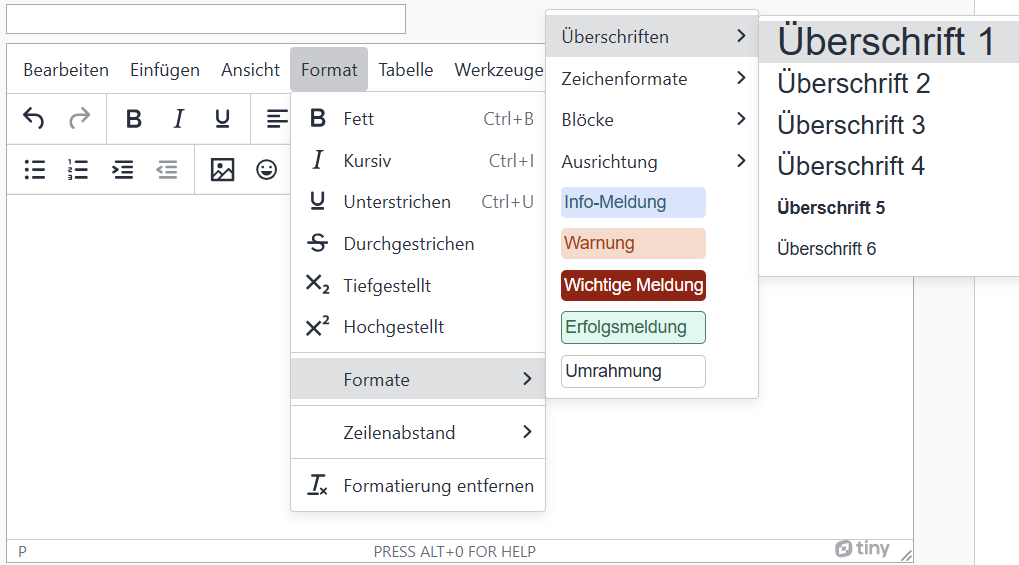
-
Insert or edit text > Paragraph format > Heading selection
BITV-Guidelines
- Each slide has a unique and meaningful title.
Slide titles are used to briefly and concisely name the content of a slide. In addition, the slide titles are used by users of the voice output for navigation and orientation within the presentation. They should therefore be different for each slide.
Realization of the criteria
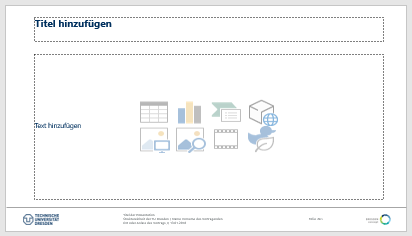
Enter the slide title in the appropriate place on the slide layout. Otherwise the heading wont be marked as such.
Additional Information
BITV-Guidelines
- Headings are labeled with appropriate tags, nested correctly acording to the heading levels and describe the following content.
Headings are used to structure content: related paragraphs are grouped and the content is easily manageable. Users who cannot see a purely visual distinction between headings and other texts depend on the structure being accessible independently of the presentation. By using headline elements, these can not only be interpreted as such by assistance systems (e.g. screen readers), tables of contents can also be generated and the presentation can be adapted to special needs.
Nesting
proper nesting to group content- Headings are labeled with appropriate tags, nested correctly acording to the heading levels and describe the following content.
Headings are used to structure content: related paragraphs are grouped and the content is easily manageable. Users who cannot see a purely visual distinction between headings and other texts depend on the structure being accessible independently of the presentation. By using headline elements, these can not only be interpreted as such by assistance systems (e.g. screen readers), tables of contents can also be generated and the presentation can be adapted to special needs.
- Heading 1
- Heading 2
- Heading 3
- ...
- Heading 2
Markup of Headings

- Headings are labeled with appropriate tags, nested correctly acording to the heading levels and describe the following content.
Headings are used to structure content: related paragraphs are grouped and the content is easily manageable. Users who cannot see a purely visual distinction between headings and other texts depend on the structure being accessible independently of the presentation. By using headline elements, these can not only be interpreted as such by assistance systems (e.g. screen readers), tables of contents can also be generated and the presentation can be adapted to special needs.
BITV-Guidelines
Paragraphs
- Paragraphs and highlighted sections are marked as such.
- Text should be used to present information directly, rather than through images containing text.
Realization of the criteria

- Paragraphs and highlighted sections are marked as such.
- Text should be used to present information directly, rather than through images containing text.
Realization of the criteria
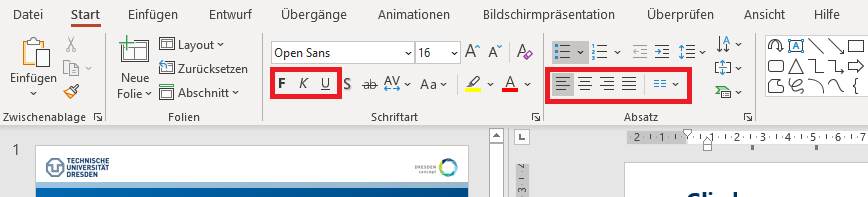
Paragraph: Menu bar: Home > Paragraph
Highlights:
Menu bar: Home > Font > Bold/Italic/Cursive
Additional Information
- Paragraphs and highlighted sections are marked as such.
- Text should be used to present information directly, rather than through images containing text.
Markup of Paragraphs
<p>This is an <strong>important</strong> paragraph.</p>
Criteria and Barriers of ILIAS
The following criteria are taken from the checklist:- Bold (str), italic (emp), and underline (imp) are not used.
Bold (str), italic (emp), and underlined (imp) emphasis are not properly marked and therefore cannot be recognized by non-sighted people.
Add Paragraph
-
Click the plus sign and choose "Insert Text".
-
Under "Paragraph Formatting", choose a style and type your text. Finally, go to "Finish Text Editing".
- Paragraphs and highlighted sections are marked as such.
- Text should be used to present information directly, rather than through images containing text.


- Paragraphs and highlighted sections are marked as such.
- Text should be used to present information directly, rather than through images containing text.
BITV-Guidelines
Blocks
- There are no links from complete blocks.
- The type of use is discussed in the context of a block.
Linked and unlinked blocks are visually indistinguishable. Screen readers read the entire block content as link text. Block functions cannot be recognized by screen readers or sighted people.
Quotations
- Quotations are marked as such.
Quotations must be marked with appropriate structural elements so that assistance systems can highlight them differently (color or vocal). It also allows keyboard users to skip the entire section.
Markup of Quotations
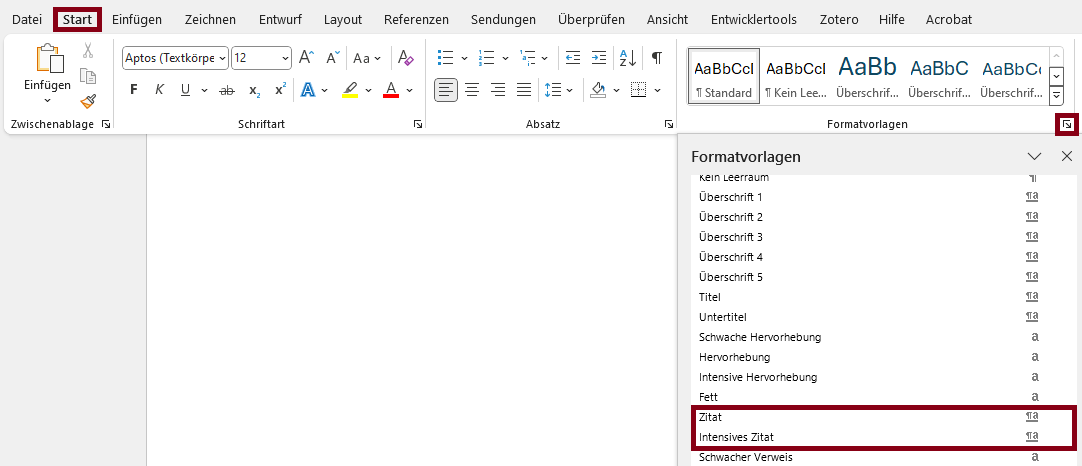
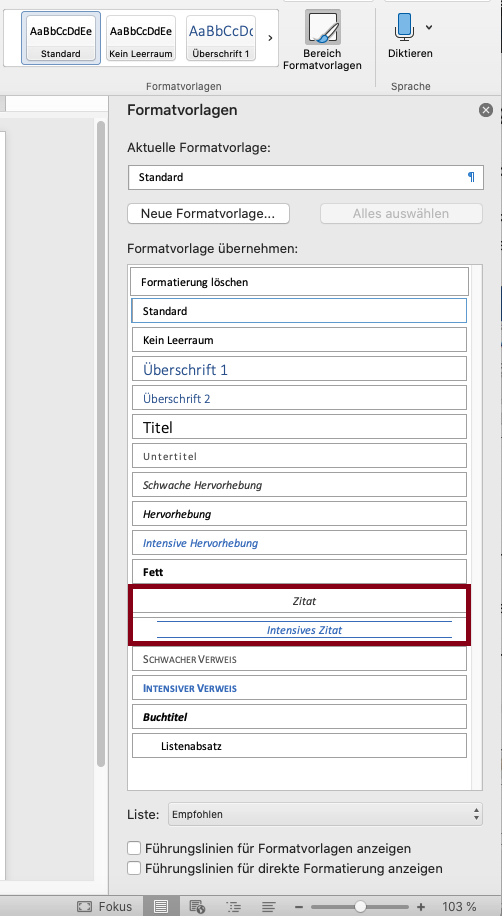
BITV-Guidelines
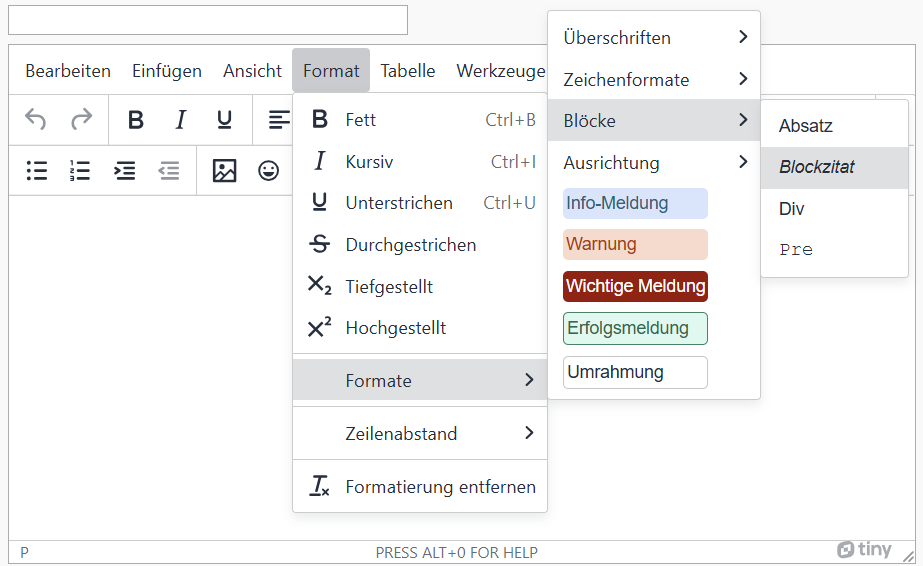
PowerPoint does not have a style sheet for quotations.
For quotations, use the usual citation styles for the language you are using (quotation marks, information about the source in brackets, etc.).
- Quotations are marked as such.
Quotations must be marked with appropriate structural elements so that assistance systems can highlight them differently (color or vocal). It also allows keyboard users to skip the entire section.
Markup of Quotations
                    <blockquote>
                        <p>This is an example of a long quote. It might contain multiple sentences, or even multiple paragraphs.</p>
                        <cite>Source of the Quote</cite>
                    </blockquote>
BITV-Guidelines
Quotations must be marked with appropriate structural elements so that assistance systems can highlight them differently (color or vocal). It also allows keyboard users to skip the entire section.
Criteria and Barriers of ILIAS
The following criteria are taken from the checklist:- Quotations in the text are indicated by quotation marks.
- No block quotes are used.
Block quotes are not properly marked by the Ilias page editor and should be avoided. Quotations in the text should be marked with quotation marks. The text highlighting "Quote" should not be used as it does not have a sufficient contrast ratio to the text.
- Quotations are marked as such.
Quotations must be marked with appropriate structural elements so that assistance systems can highlight them differently (color or vocal). It also allows keyboard users to skip the entire section.
Markup of Quotations
- Quotations are marked as such.
Quotations must be marked with appropriate structural elements so that assistance systems can highlight them differently (color or vocal). It also allows keyboard users to skip the entire section.
Markup of Quotations
Lists
- Lists: Enumerations and numberings are marked as such.
Lists are often hierarchical structures. In order to make them more than just visually appropriate, they need to use structural elements or styles to create them. This allows users of assistance systems to skip lists or individual entries, as well as create another presentation that suits them better.
Markup of Lists
- Lists must be marked with the list function, not just with 1.2.3. or indents (e.g. "-").
Lists are often hierarchical structures. In order to make them more than just visually appropriate, they need to use structural elements or styles to create them. This allows users of assistance systems to skip lists or individual entries, as well as create another presentation that suits them better.
Insert list
-
Click the plus sign and choose "Insert Text".
-
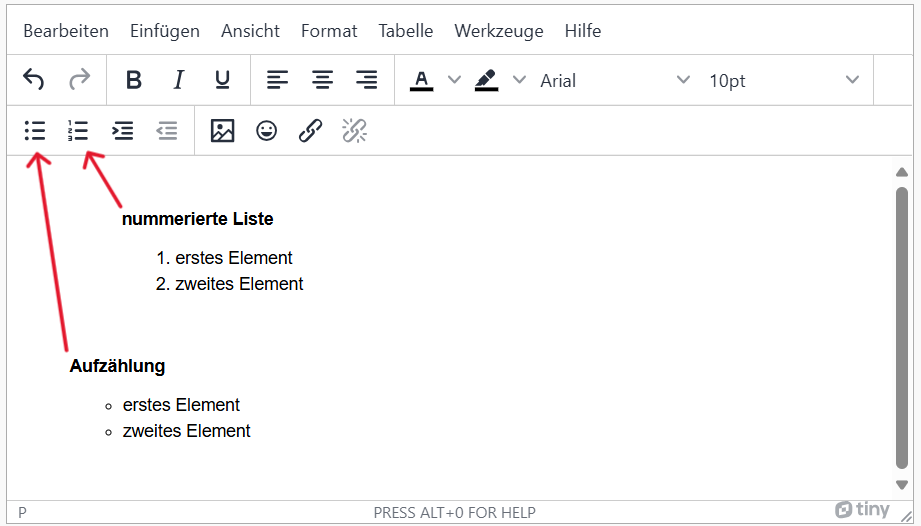
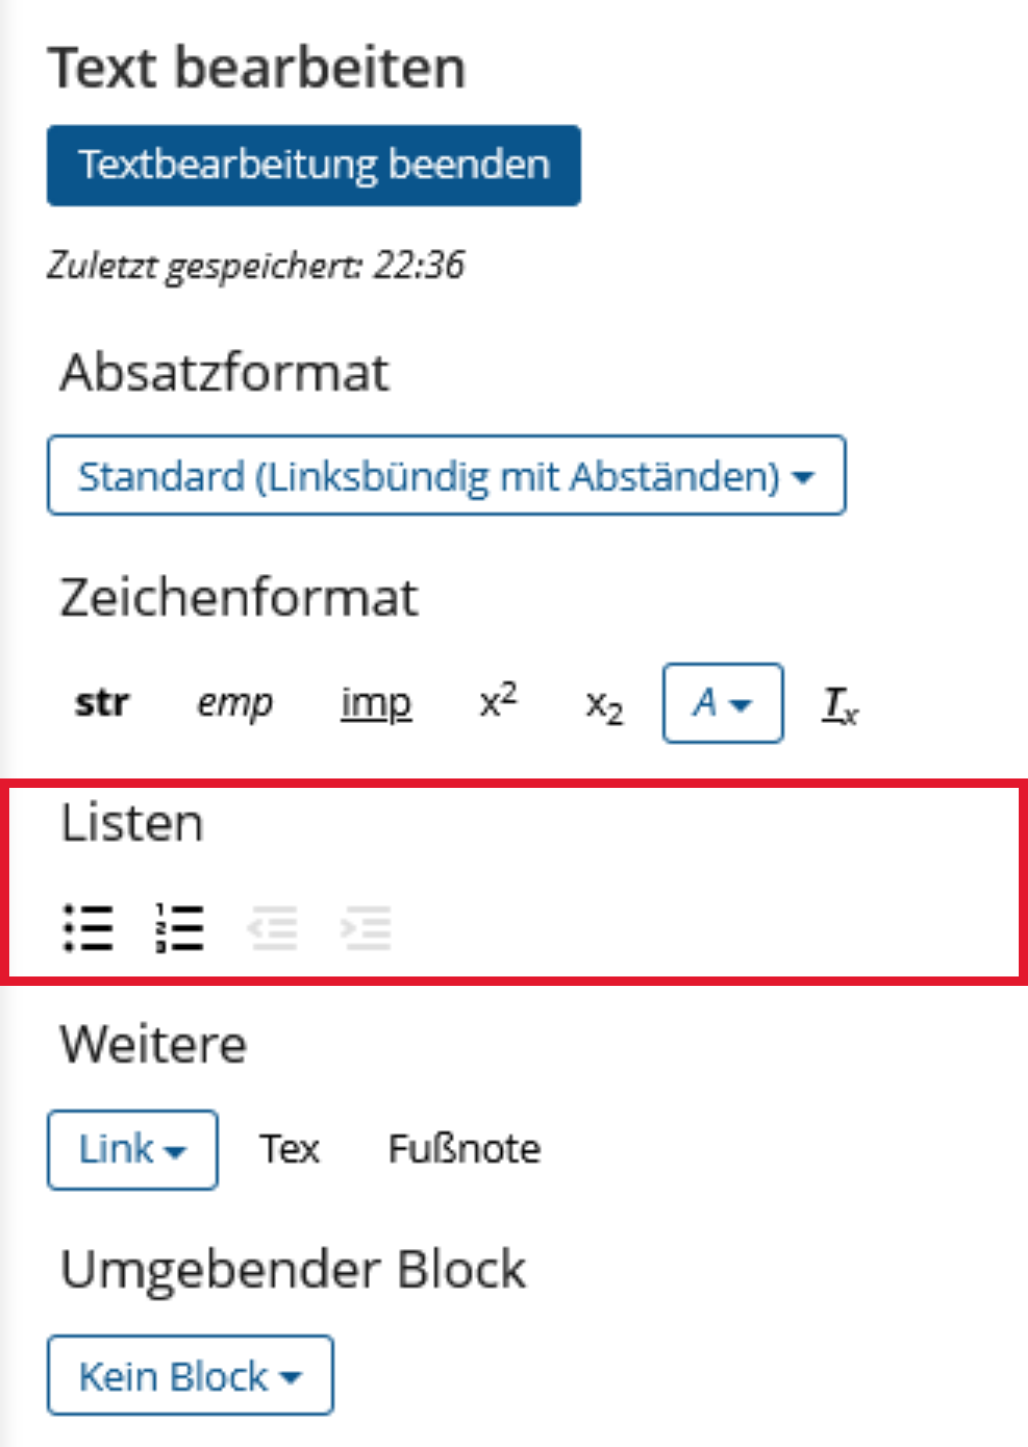
Under "Lists", select Bulleted or Numbered List and enter your text. Finally, go to "Finish text editing".
Insert advanced list
An advanced list is a list that can contain other content modules, such as images or videos, in addition to text.
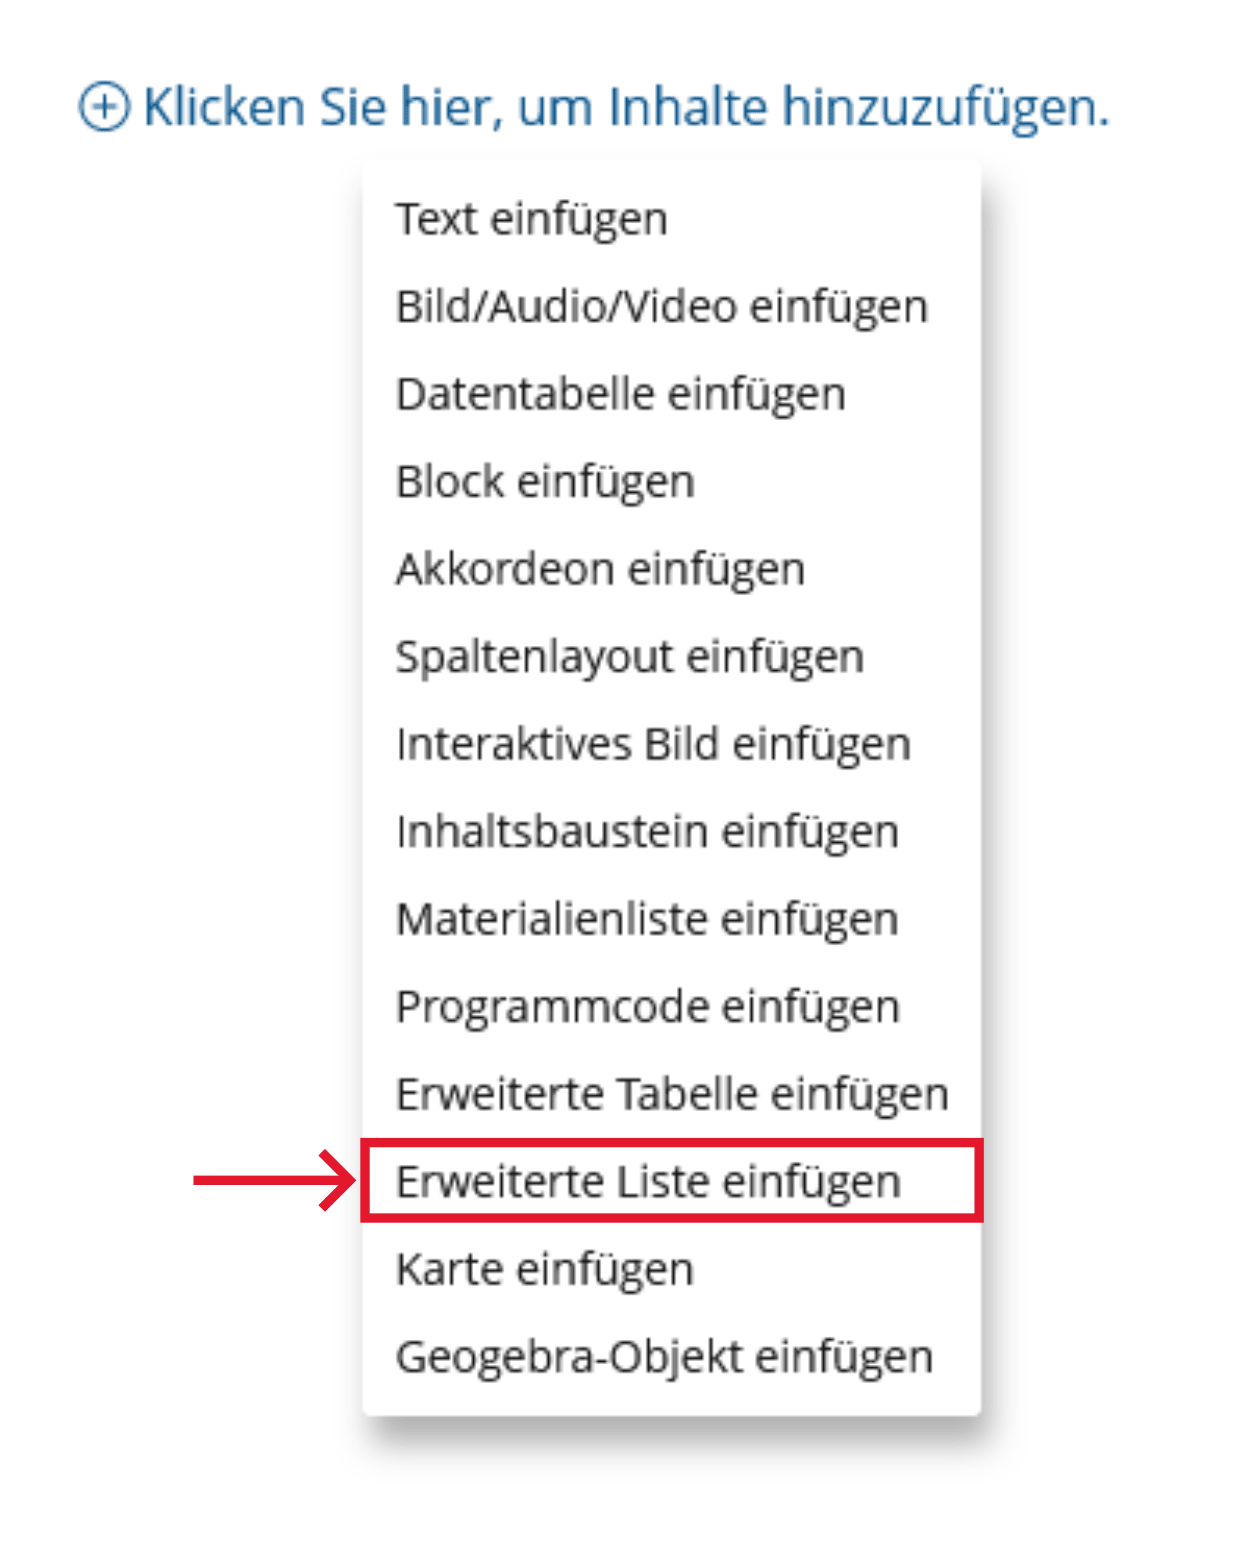
-
Click the plus sign and choose "Insert advanced list".
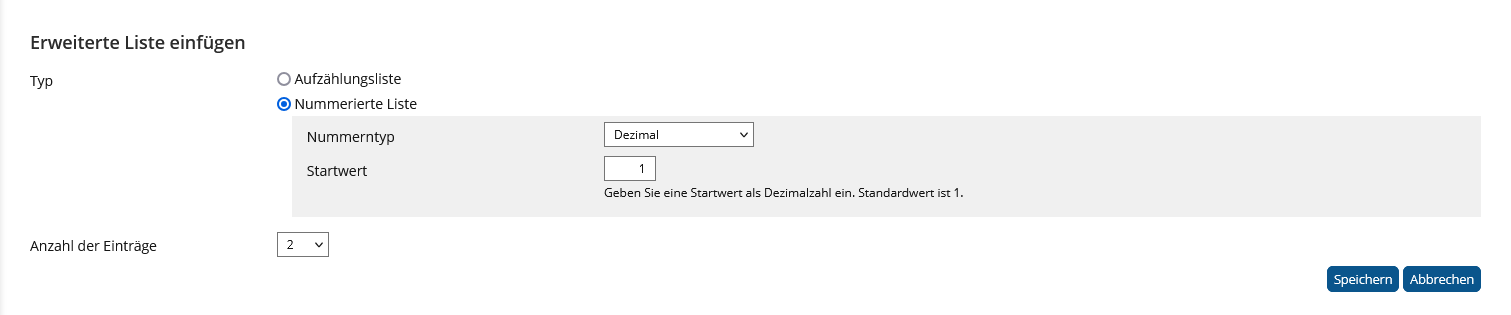
-
Choose "Enumerated list" or "Numbered list". For "Numbered list", you can specify a number type and a starting value. Finally, select "Save".
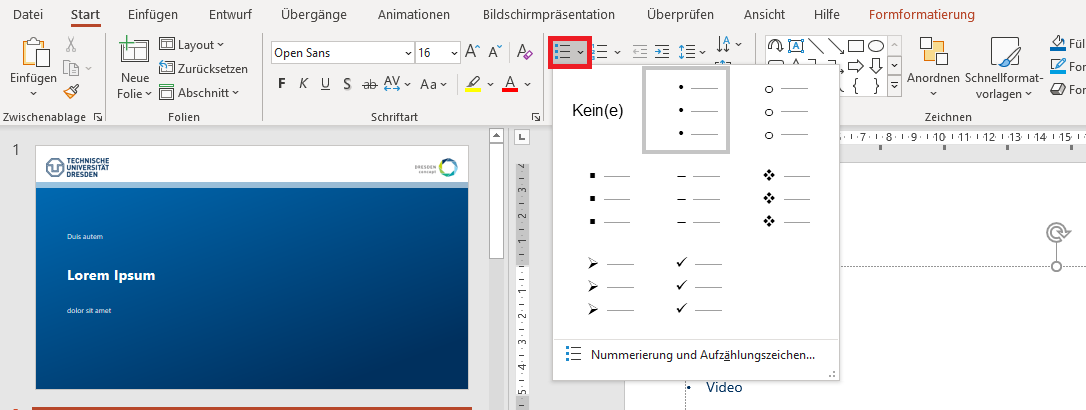
- Lists: Enumerations and numberings are marked as such.
Lists are often hierarchical structures. In order to make them more than just visually appropriate, they need to use structural elements or styles to create them. This allows users of assistance systems to skip lists or individual entries, as well as create another presentation that suits them better.
Realization of the criteria
Menu bar: Home > Paragraph > Bullets or Numbering
Additional Information
- Lists: Enumerations and numberings are marked as such.
Lists are often hierarchical structures. In order to make them more than just visually appropriate, they need to use structural elements or styles to create them. This allows users of assistance systems to skip lists or individual entries, as well as create another presentation that suits them better.
Markup of Lists
                            <ol>
                                <li>This is the first item of the ordered list</li>
                                    <ul>
                                        <li>This is the first item of the nested unordered list</li>
                                    </ul>
                            </ol>
                          <dl>
                            <dt>Date</dt>
                            <dd>Calendar entry 1</dd>
                            <dd>Calendar entry 2</dd>
                          </dl>
- Lists: Enumerations and numberings are marked as such.
Lists are often hierarchical structures. In order to make them more than just visually appropriate, they need to use structural elements or styles to create them. This allows users of assistance systems to skip lists or individual entries, as well as create another presentation that suits them better.
Markup of Lists
BITV-Guidelines
Tables
- The tables have a logical structure, understandable headings and contextual information.
- Complex tables with merged cells: The assignment of headings and content is correct ('scope' or 'id' and 'headers' attributes are used).
- Layout tables, which only format text, are avoided or they do not have structural markup.
Visually impaired and blind users develop an idea of the structure of a table based on headings and other information available in context. To support this, tables need to have a clear structure and unambiguous headings. If headings in headers or columns are marked with structure elements, screen readers can read them aloud when rows or columns are changed.
Tables should not be used to control the layout of your page, because then screenreaders will read out the page in a way that reflects the table structure, not the visual layout.
Markup of Tables
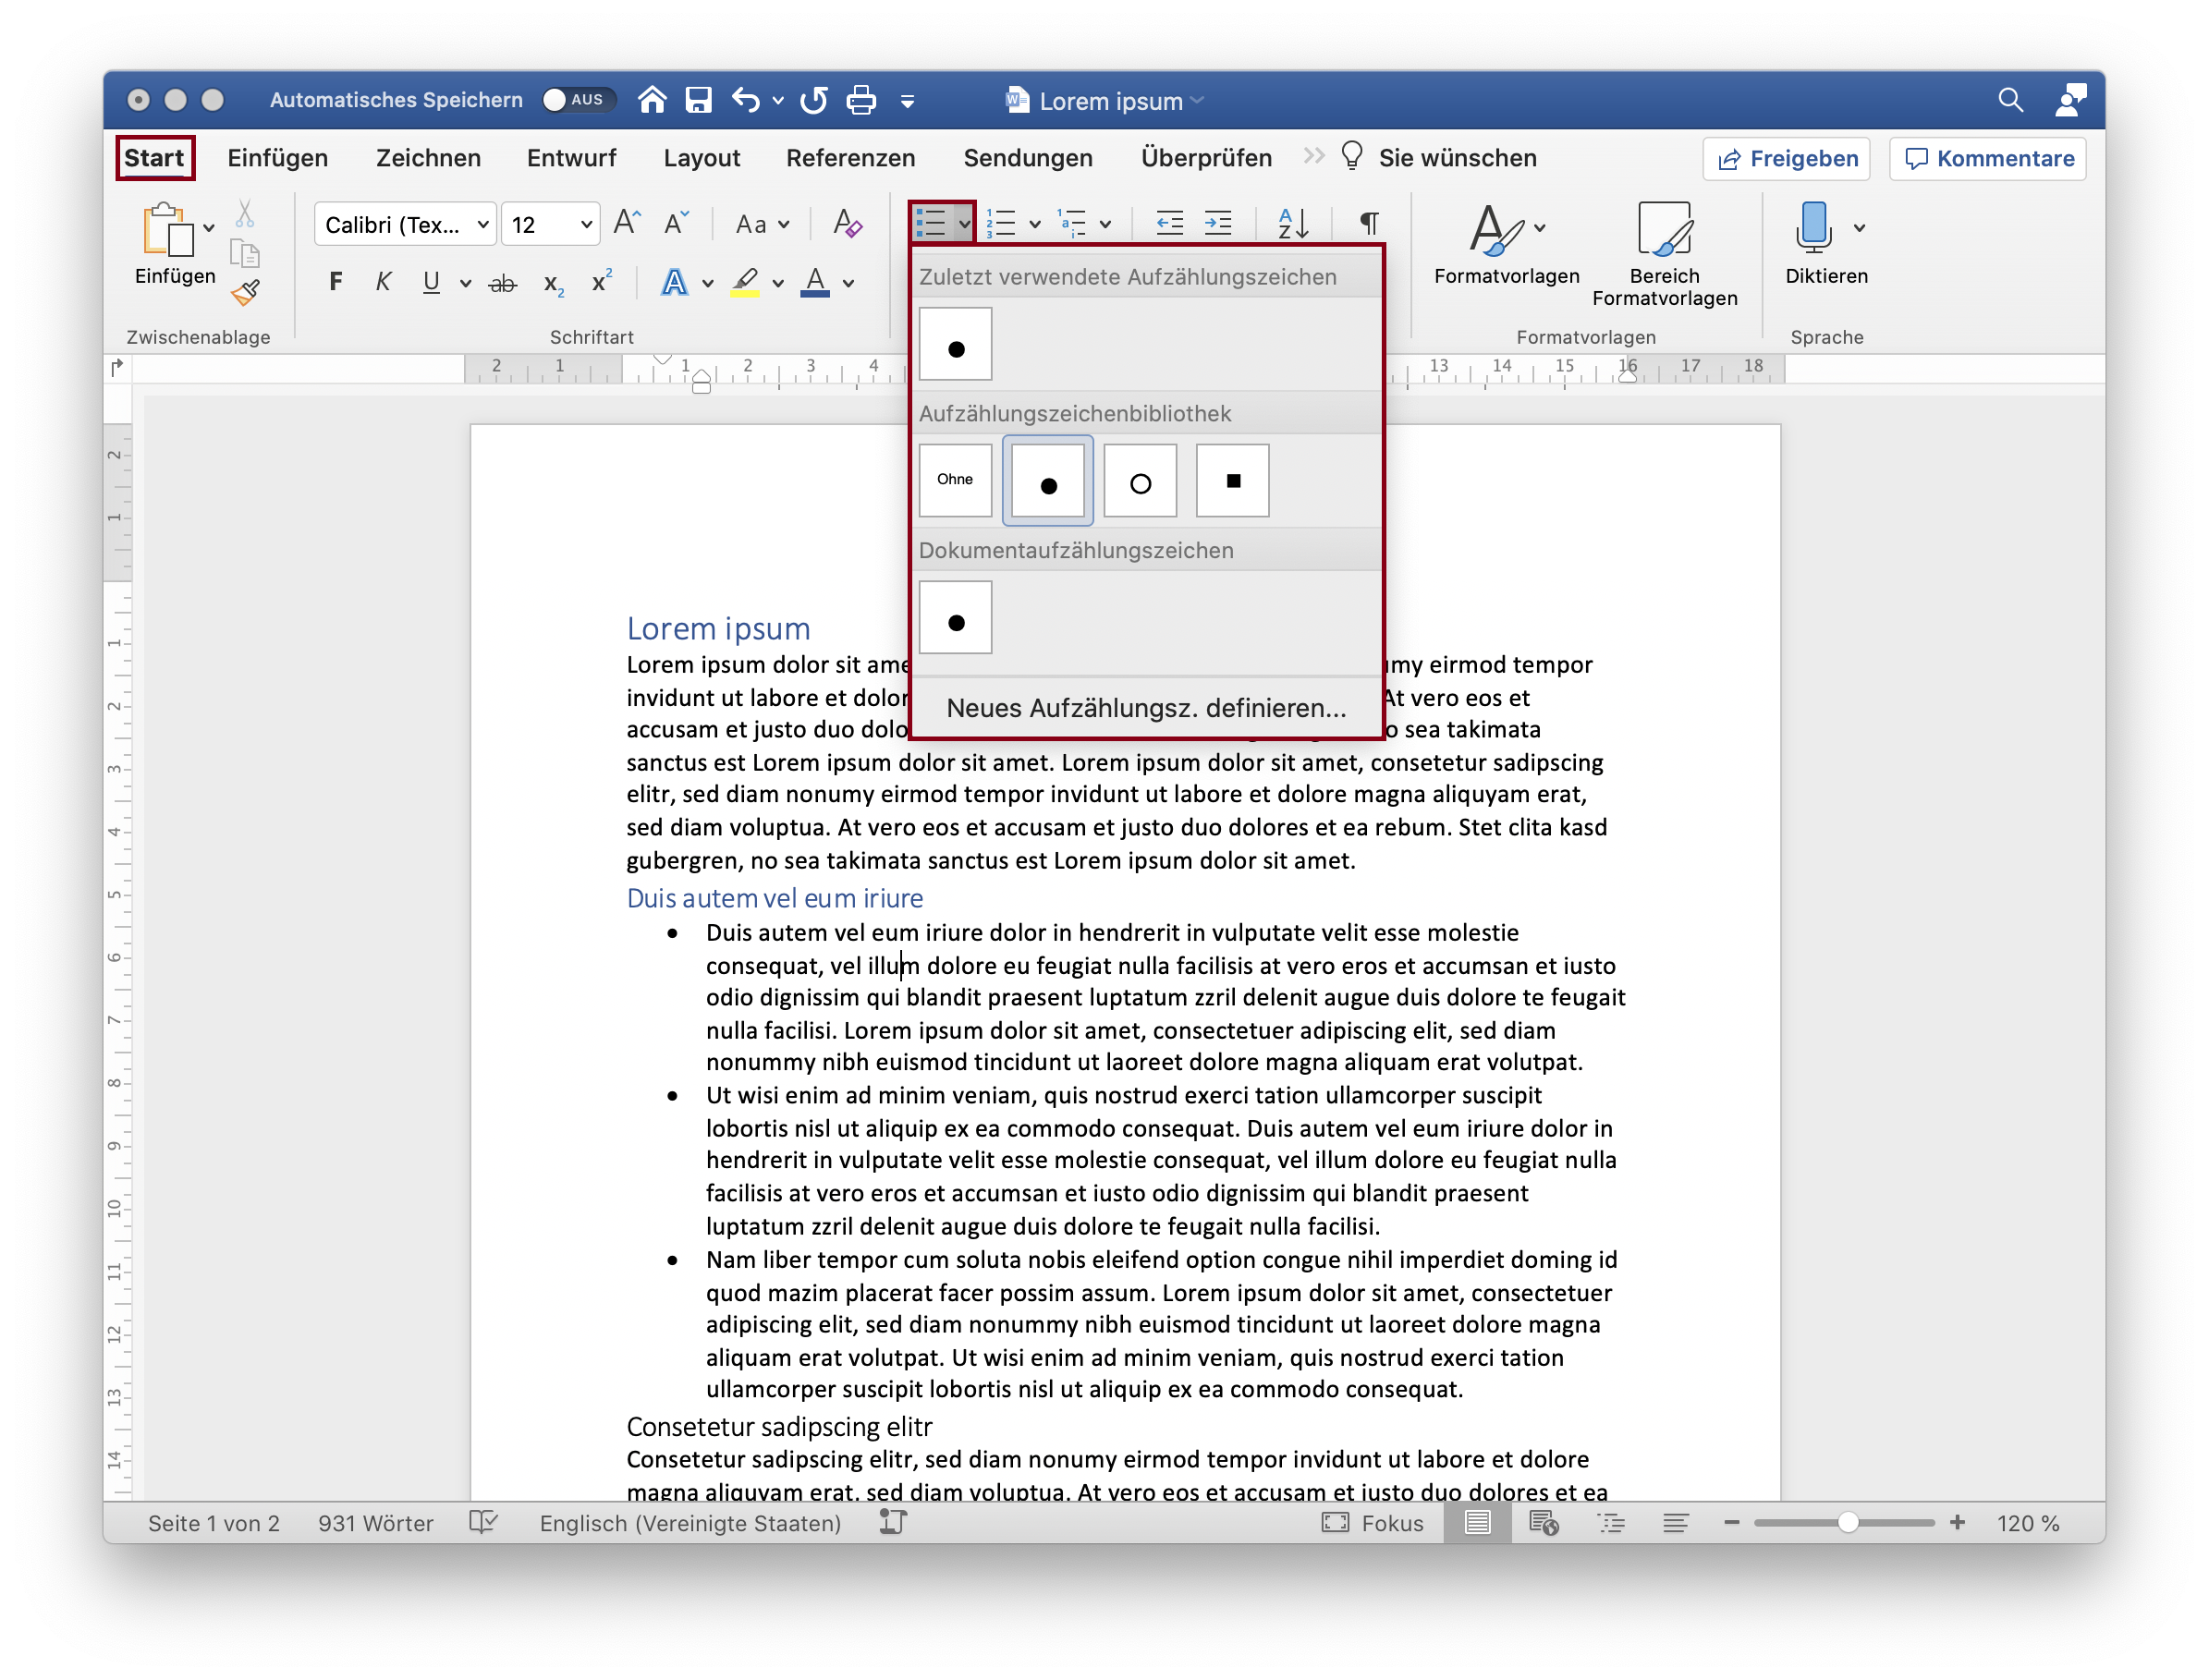
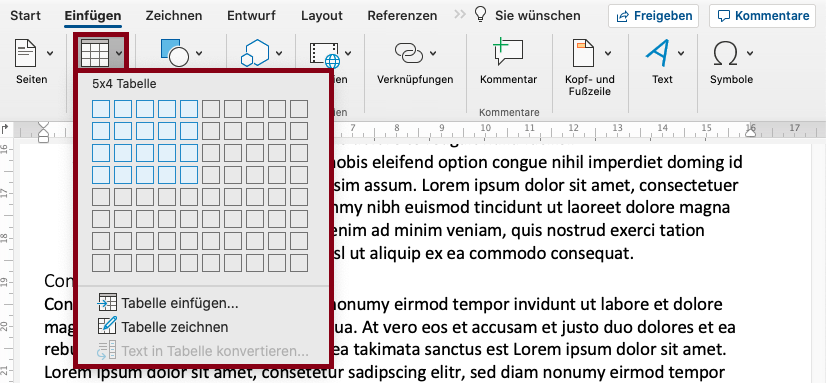
Create Table
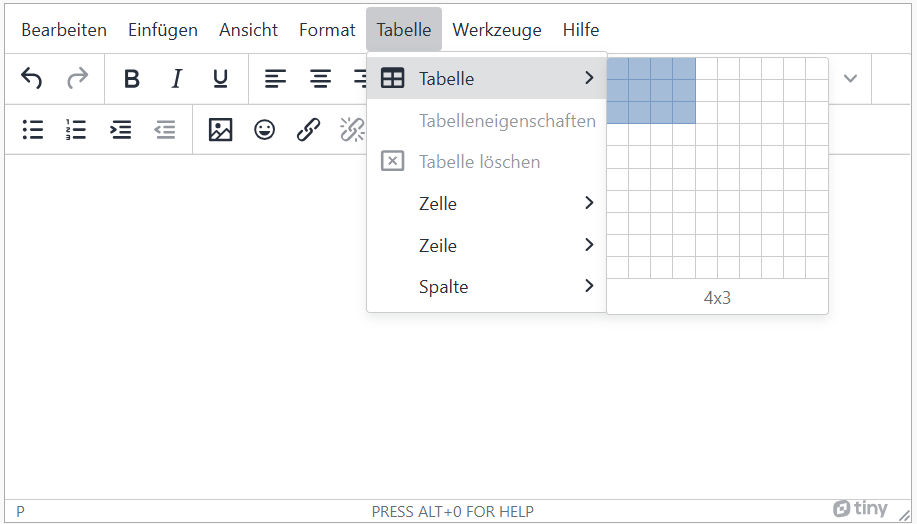
Format table
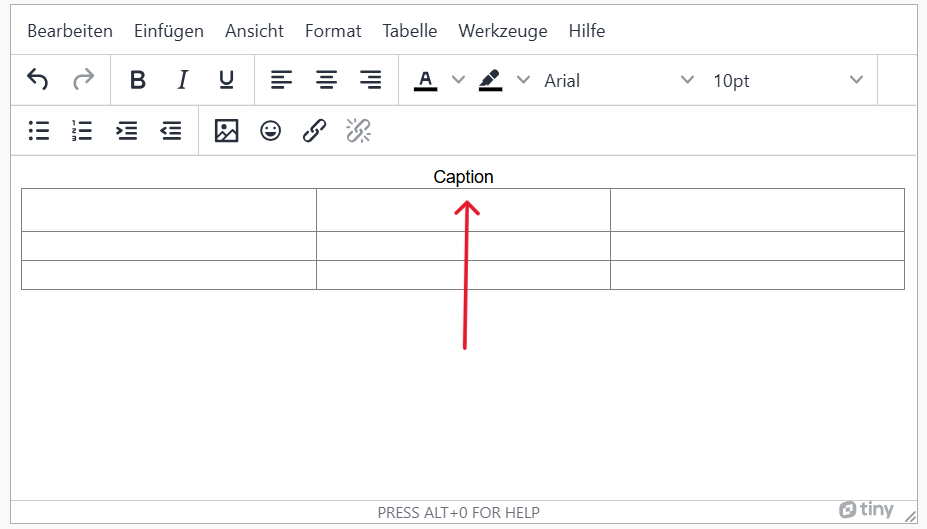
Add caption
-
In the menu bar choose Table and then Table properties.
-
Enable Caption.
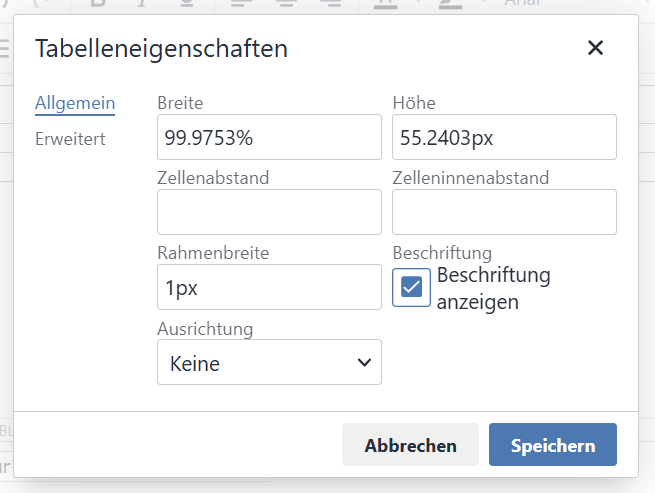
-
Change caption to fit your content.
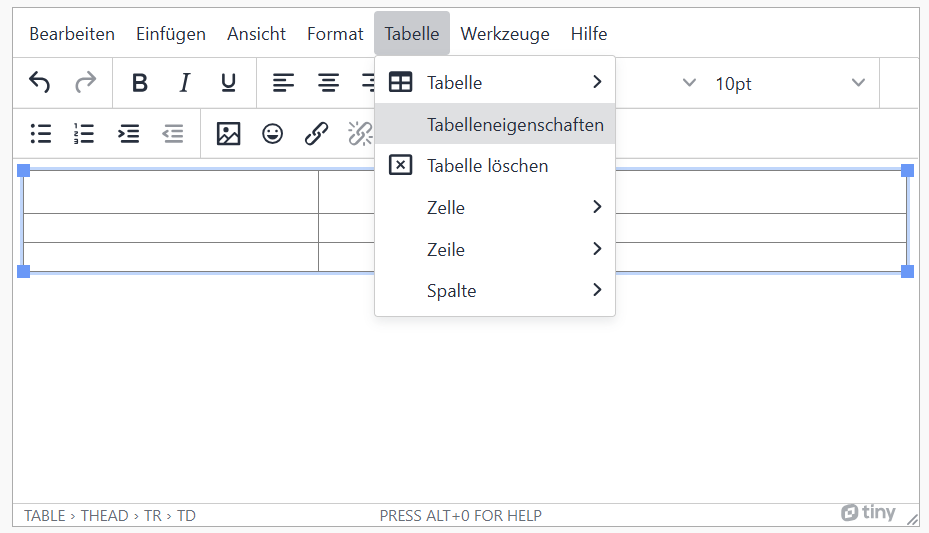
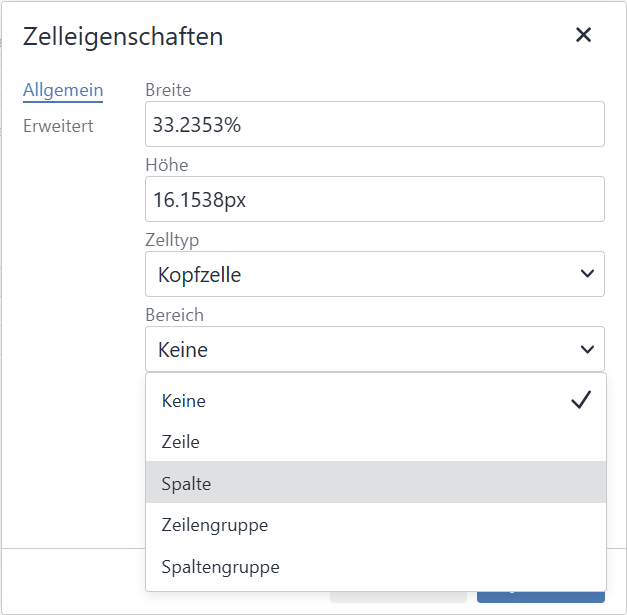
Mark header of the table
-
First select the desired row or column..
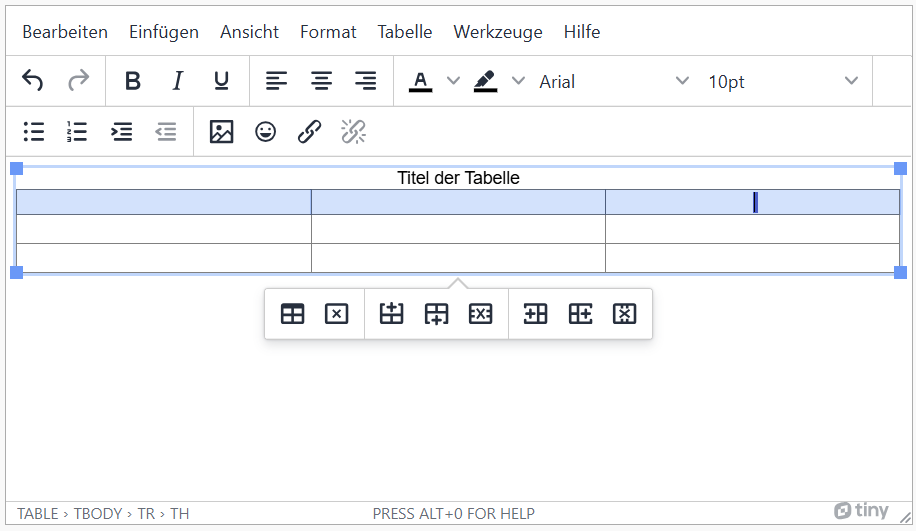
-
Then choose the following: menu bar > Table > Cell > Cell properties.
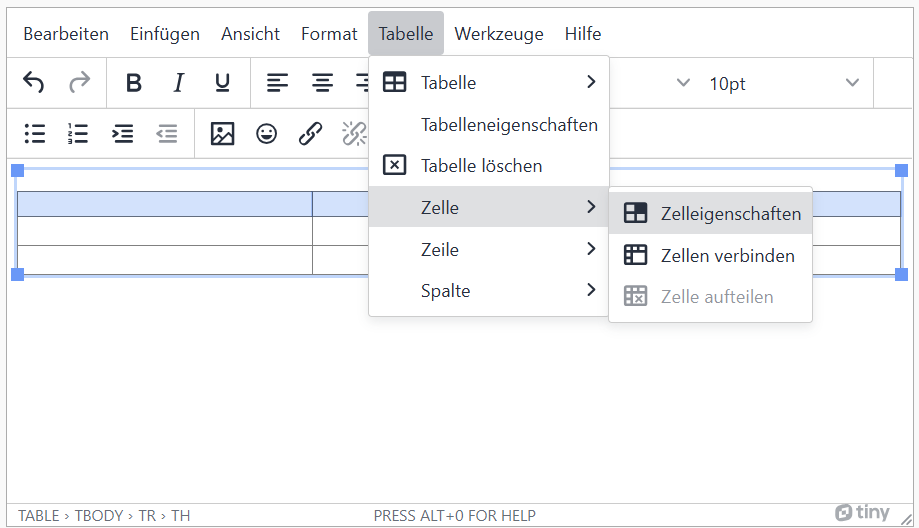
-
As Cell type choose 'Header cell'.
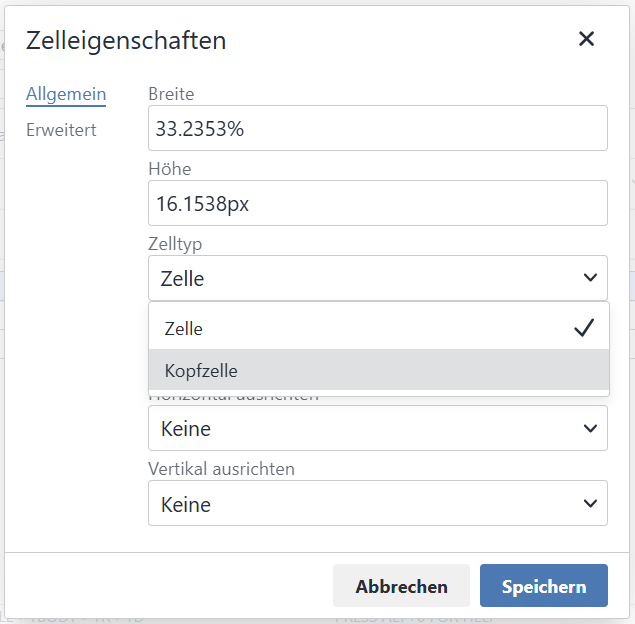
-
Select 'Column' as the Scope for column headings and 'Row' for row headings.
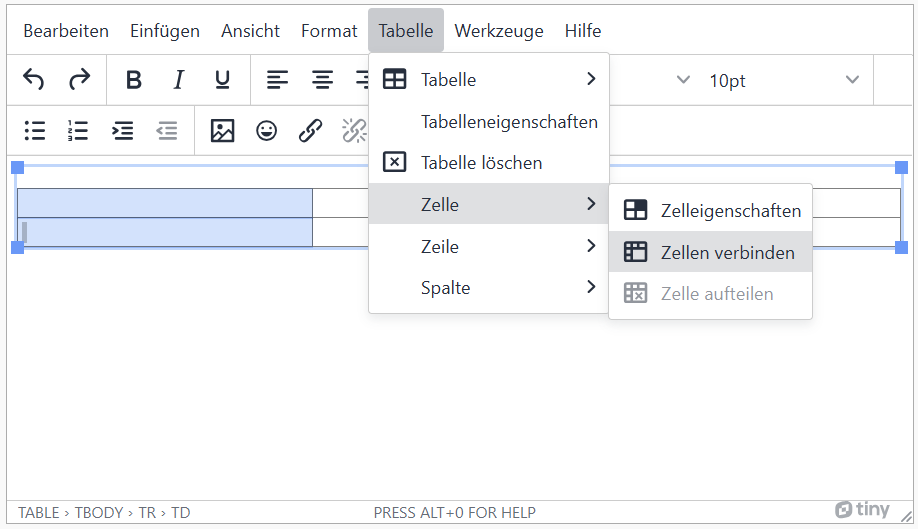
Complex table: merge cells
-
Mark cells to be connected
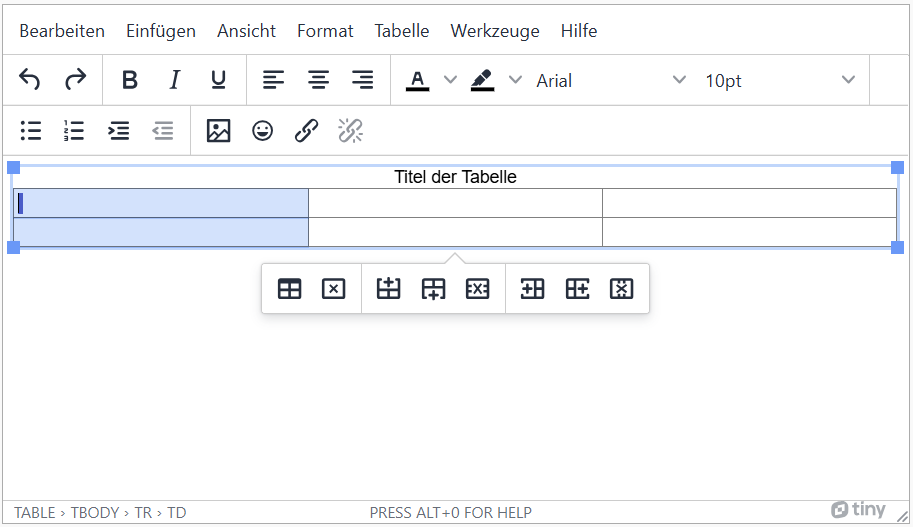
-
Menu bar: Table > Cell > Merge Cells
- Tables with multiple header rows or columns are not used.
- Layout tables are not used. Layout tables are tables that create the visual structure of the website.
- Table footers were not used.
- Tables have a logical structure, understandable headings and contextual information.
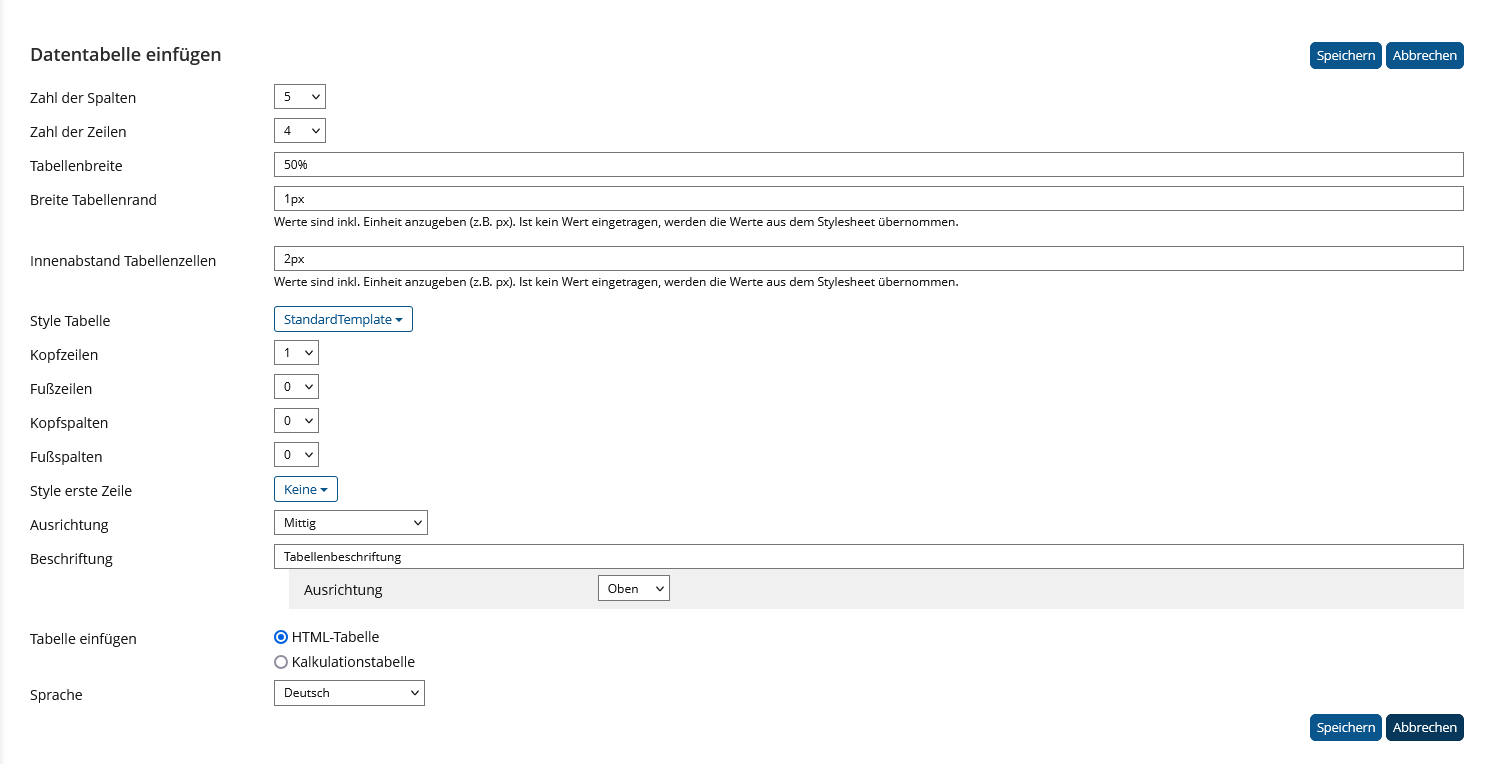
Only one header row or column should be used. It should contain meaningful headings for each row or column. Footers and footer columns should be avoided, as they are not properly marked. A label should be added that briefly describes the contents of the table. This will appear above or below the table. The language selection has no function at the moment, but should be filled in for the sake of completeness.
Add Table
-
Click the plus sign and choose "Insert Data Table".

-
The following points need to be considered regarding properties:
- Use only one header
- Do not use footers or footer columns
- Add Caption
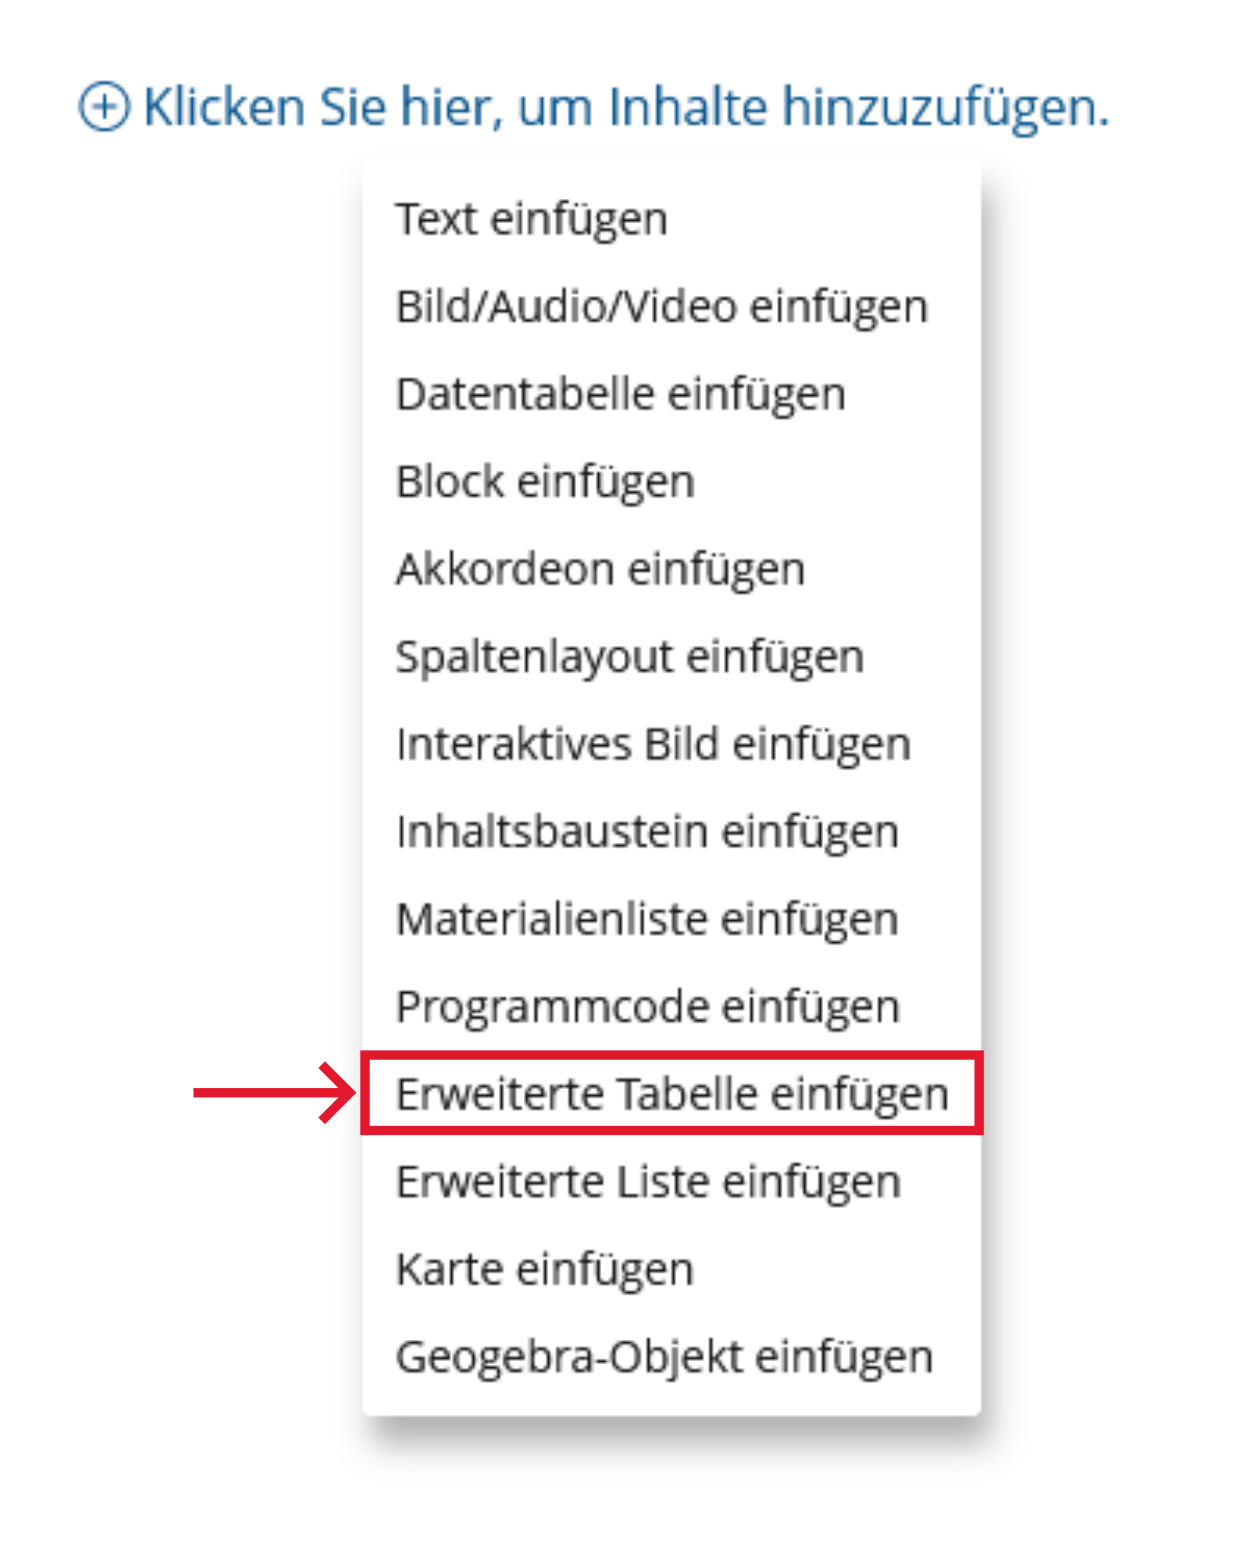
Insert Extended Table
An extended table is a table that can contain other content modules, such as images or videos, in addition to text.
-
Click the plus sign and choose "Insert Advanced Table".
-
Proceed as you would for a simple table.
- The tables have a logical structure, understandable headings and contextual information.
- Complex tables with merged cells: The assignment of headings and content is correct ('scope' or 'id' and 'headers' attributes are used).
- Layout tables, which only format text, are avoided or they do not have structural markup.
Visually impaired and blind users develop an idea of the structure of a table based on headings and other information available in context. To support this, tables need to have a clear structure and unambiguous headings. If headings in headers or columns are marked with structure elements, screen readers can read them aloud when rows or columns are changed.
Tables should not be used to control the layout of your page, because then screenreaders will read out the page in a way that reflects the table structure, not the visual layout.
Markup of Tables
Format table with html code
-
Provide a Caption:
Use the <caption> element to provide a brief overview of the table. This helps users understand what kind of information to expect in the table.
                                <table>
                                <caption>This is a caption for this table.</caption>
                                  ...
                                </table>
This is a caption for this table. Heading 1 Heading 2 value 1 value 2 -
Create the table content:
Use thead and tbody to structure your table.
                                <table>
                                <caption>This is a caption for this table.</caption>
                                  <thead>
                                    <tr>
                                      <th >Heading 1</th>
                                      <th >Heading 2</th>
                                    </tr>
                                  </thead>
                                  <tbody>
                                    <tr>
                                      <td>value 1</td>
                                      <td>value 2</td>
                                    </tr>
                                    ...
                                  </tbody>
                                </table>
This is a caption for this table. Heading 1 Heading 2 value 1 value 2 -
Specify Scope for Headers:
Use the scope attribute on <th> elements to specify whether they are headers for a column (scope="col") or a row (scope="row"). This is particularly important for tables with row and column headings and helps assistive technologies to assign the headings correctly to the data cells.
                                      <table>
                                        <tr>
                                          <td> </td>
                                          <th scope="col">Monday</th>
                                          <th scope="col">Tuesday</th>
                                        </tr>
                                        <tr>
                                          <th scope="row"> 09:00 – 11:00</th>
                                          <td>Closed</td>
                                          <td>Open</td>
                                        </tr>
                                        ...
                                      </table>
Monday Tuesday 09:00 – 11:00 Closed Open -
Creating merged cells:
The rowspan and colspan attributes can be used to connect table cells. Rowspan connects the specified number of cells within a row, colspan in a column.
Furthermore use id and headers attributes to explicitly associate data cells with the correct headers.
                                  <table>
                                    <tr>
                                      <th id="name">First Name</th>
                                      <th id="job">Job role</th>
                                    </tr>
                                    <tr>
                                      <td headers="name">Lisa</td>
                                      <td headers="job" rowspan="2">Marketing Coordinator</td>
                                    </tr>
                                    <tr>
                                      <td headers="name">John</td>
                                    </tr>
                                    <tr>
                                      <td colspan="2">Welcome to the company</td>
                                    </tr>
                                  ...
                                  </table>
First Name Job role Lisa Marketing Coordinator John Welcome to the company
- The table has a simple structure. It only has a header row and a few rows and columns.
- The header row is marked as a heading.
- The table has an alternative text with a summary.
Visually impaired and blind users develop an idea of the structure of a table based on headings and other information available in context. To support this, tables need to have a clear structure and unambiguous headings. If headings in headers or columns are marked with structure elements, screen readers can read them aloud when rows or columns are changed.
Realization of the criteria
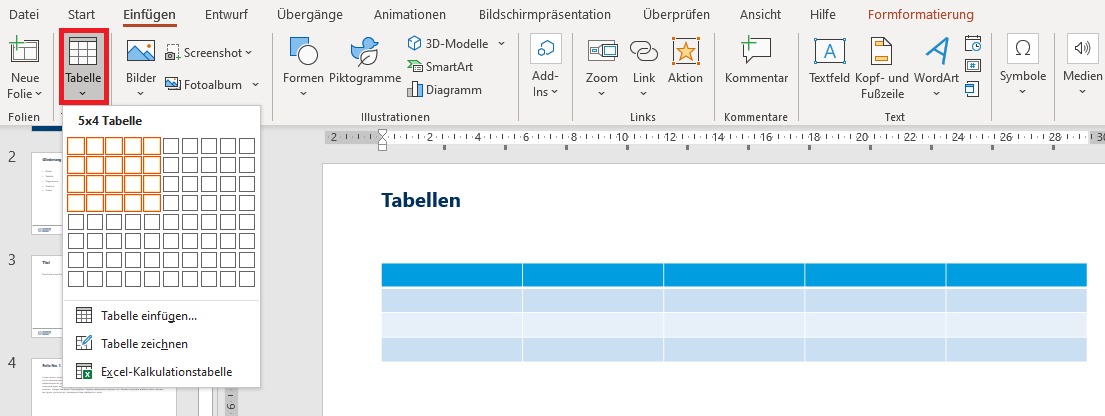
Do not use a header column, as this is not marked correctly by PowerPoint. You should also avoid complex tables (with many entries or linked cells). These not only make slides confusing, but are also difficult for blind and visually impaired people to understand.
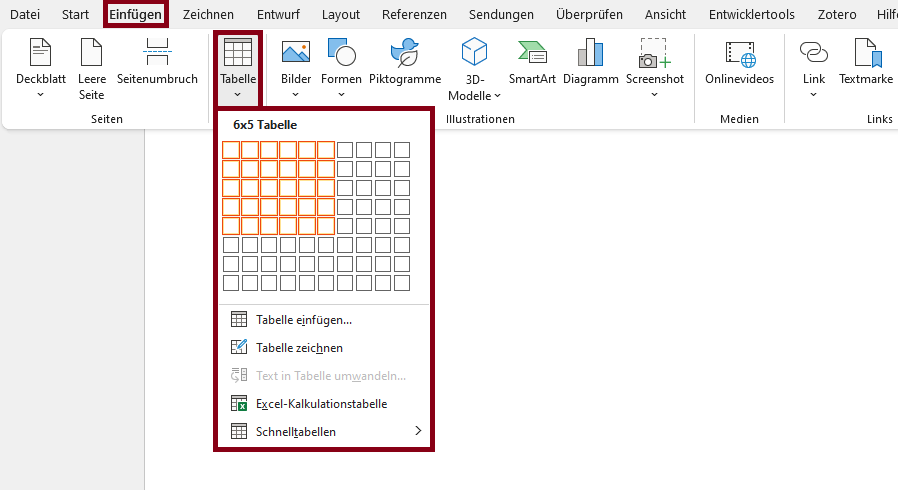
- Insert table: Menu bar: Insert > Tables > Table
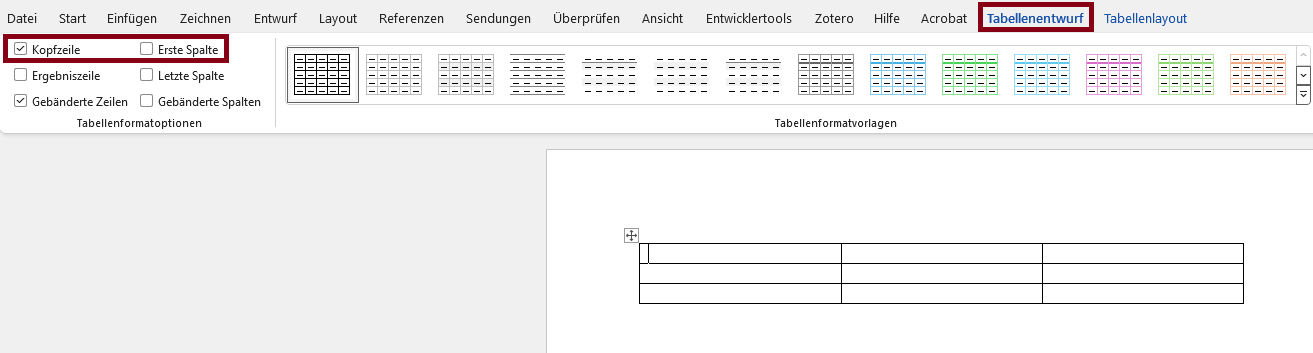
- Mark header row as heading:Menu bar: Table Design > Table Style Options > Header Row
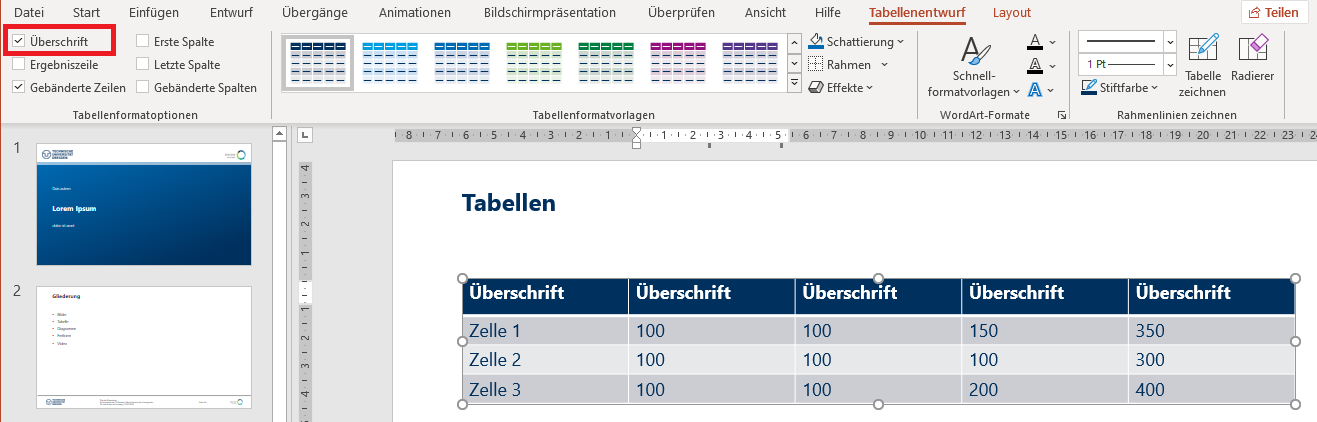
- Add alternative text: Context menu (right click) > View Alt Text > Enter alternative text

Additional Information
BITV-Guidelines
- The tables have a logical structure, understandable headings and contextual information.
- Complex tables with merged cells: The assignment of headings and content is correct ('scope' or 'id' and 'headers' attributes are used).
- Layout tables, which only format text, are avoided or they do not have structural markup.
Visually impaired and blind users develop an idea of the structure of a table based on headings and other information available in context. To support this, tables need to have a clear structure and unambiguous headings. If headings in headers or columns are marked with structure elements, screen readers can read them aloud when rows or columns are changed.
Tables should not be used to control the layout of your page, because then screenreaders will read out the page in a way that reflects the table structure, not the visual layout.
Markup of Tables
Create Tables
Label Header Rows
Achtung
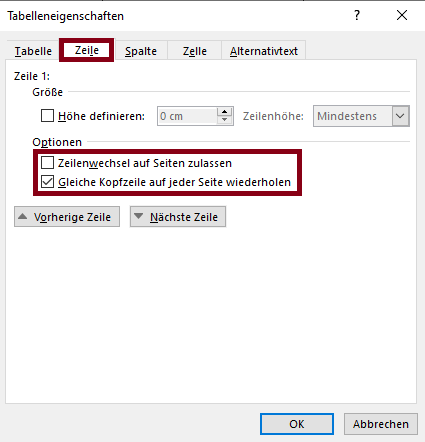
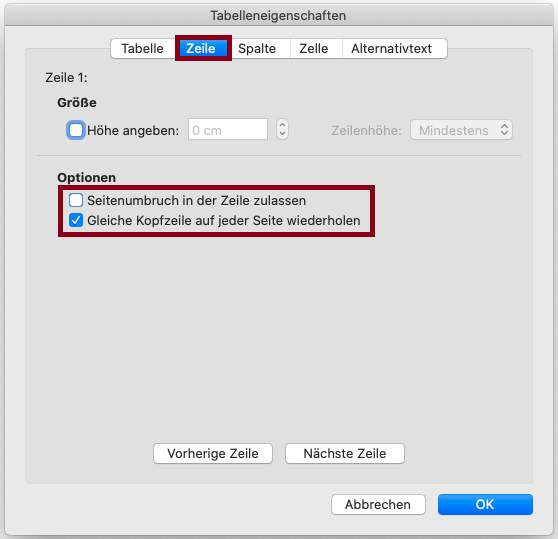
When converting to a PDF document, a multi-page table is marked up as several separate tables. Therefore, it's important that the header row is repeated on each page. Additionally, when using multi-page tables, page breaks in table rows should be disabled to ensure the tables remain easier to read and understand.
Microsoft Word: Select Table > Right-click in Table > Table Properties… > Select Repeat as header row at the top of each page/Deselect Allow row to break across pages
 Avoid using merged cells to avoid confusion and ambiguity. Using merged cells can make it difficult to correctly assign content to the correct column heading and may result in incorrect output from assistive technology. Check for the presence of merged cells using the Accessibility Checker in Microsoft Word.
Complex Tables
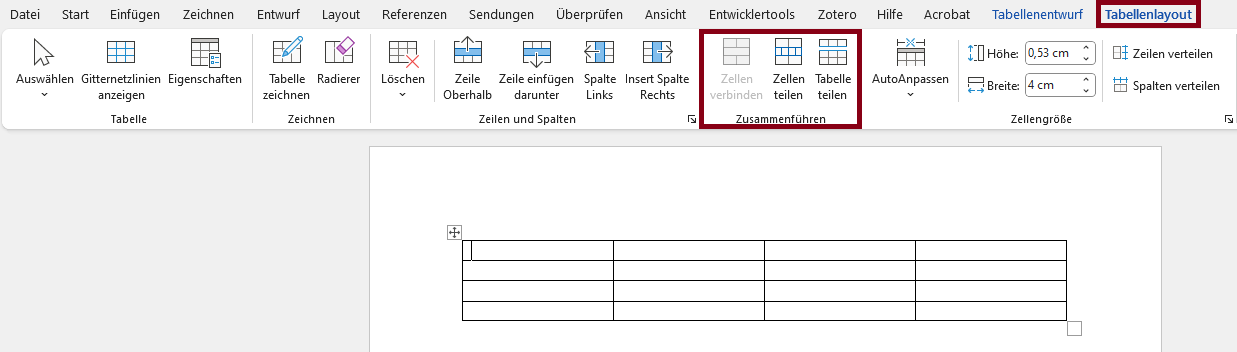
Complex, nested, multidimensional tables should be split into several simple tables to make them more readable.
- Select the cells you want to split into a separate table.
- Click in the menu bar: Table Layout > Merge > Split Cells
Create Tables
Label Header Rows

Achtung
When converting to a PDF document, a multi-page table is marked up as several separate tables. Therefore, it's important that the header row is repeated on each page. Additionally, when using multi-page tables, page breaks in table rows should be disabled to ensure the tables remain easier to read and understand.
Microsoft Word: Select Table > Right-click in Table > Table Properties… > Select Repeat as header row at the top of each page/Deselect Allow row to break across pages
 Avoid using merged cells to avoid confusion and ambiguity. Using merged cells can make it difficult to correctly assign content to the correct column heading and may result in incorrect output from assistive technology. Check for the presence of merged cells using the Accessibility Checker in Microsoft Word.
- The tables have a logical structure, understandable headings and contextual information.
- Complex tables with merged cells: The assignment of headings and content is correct ('scope' or 'id' and 'headers' attributes are used).
- Layout tables, which only format text, are avoided or they do not have structural markup.
Visually impaired and blind users develop an idea of the structure of a table based on headings and other information available in context. To support this, tables need to have a clear structure and unambiguous headings. If headings in headers or columns are marked with structure elements, screen readers can read them aloud when rows or columns are changed.
Tables should not be used to control the layout of your page, because then screenreaders will read out the page in a way that reflects the table structure, not the visual layout.
Markup of Tables
BITV-Guidelines
Cross-references
The following criteria are taken from the checklist:- Cross-references are understandable even without specific sensory perceptions such as color, shape or position.
Cross-references
To create accessible cross-references, you should make sure that they are not only based on visual features such as color, shape or position.
Positive examples: "As illustrated in Figure 3…", "As described in chapter 'Background' (p.8) ..."
Negative examples (not accessible): "In the illustration on the left...", "As described above..."
BITV-Guidelines
Links
- Link texts are meaningful and reflect the destination and purpose; download links include the file format.
- Mouse click input on links can be canceled.
- The visible link text is part of the accessible name.
Blind users who move from link to link listen to the link texts. These should be as meaningful as possible and should convey where they lead. It is also important for voice control that visible labels are also included in the accessible names of controls so that they can be pronounced correctly.
Links should not be triggered when the mouse button is pressed, but only when it is released. This enables people with motor impairments to avoid incorrect inputs by moving the mouse. Similarly, people with motor impairments use primarly the keyboard as. For this purpose, the focus sequence should be traceable to ensure easy orientation.
Meaningful link text: Make sure your link text makes sense even without context. Avoid using vague text like "click here" or "read more". If links lead to content in other formats, such as PDF, this should also be included in the name.
Markup of Links
-
toolbar > chain icon
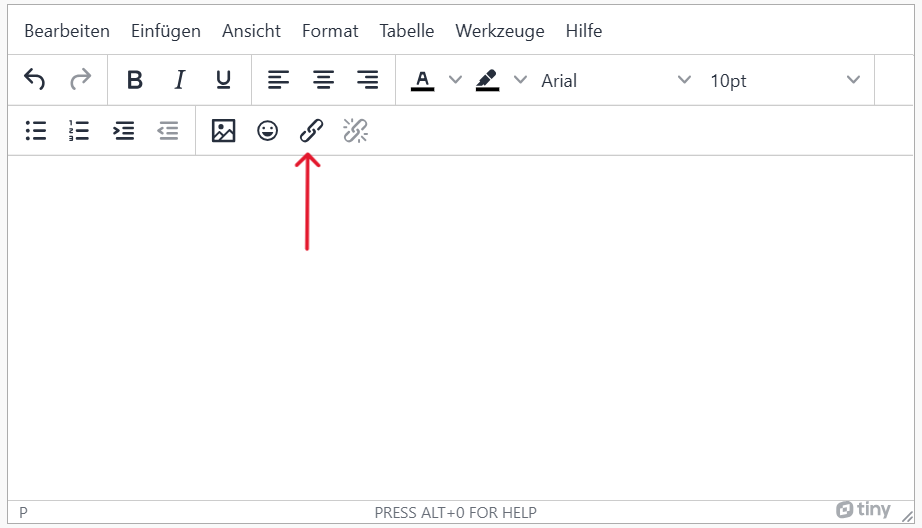
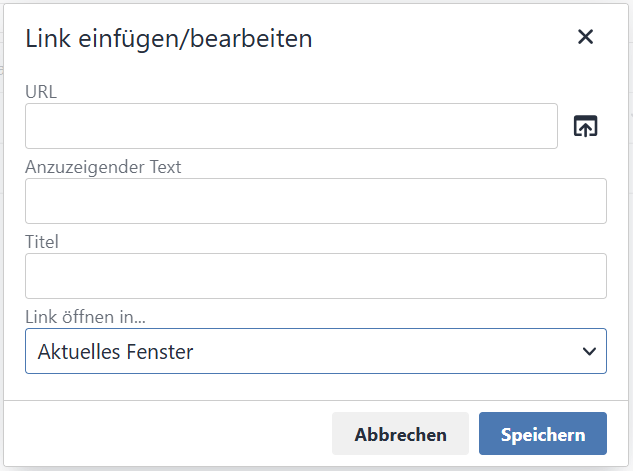
-
Then fill in URL and text to display from your link. On hover the title will be displayed as a tooltip.
- Link text is meaningful and reflects the target and purpose.
Blind users who move from link to link listen to the link texts. These should be as meaningful as possible and should convey where they lead. It is also important for voice control that visible labels are also included in the accessible names of controls so that they can be pronounced correctly.
Links should not be triggered when the mouse button is pressed, but only when it is released. This enables people with motor impairments to avoid incorrect inputs by moving the mouse. Similarly, people with motor impairments use primarly the keyboard as. For this purpose, the focus sequence should be traceable to ensure easy orientation.
Meaningful link text: Make sure your link text makes sense even without context. Avoid using vague text like "click here" or "read more". If links lead to content in other formats, such as PDF, this should also be included in the name.
Add links
-
Click the plus sign and choose "Insert Text".
-
Select the type of link under "More" - "Link".
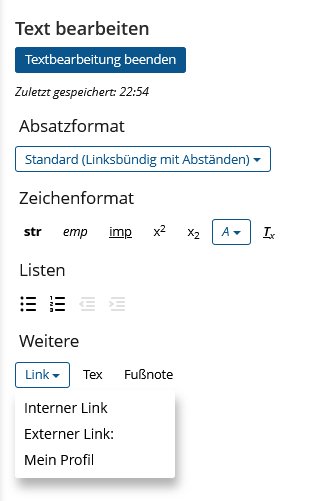
-
Select the type of link under "More" - "Link".
-
An internal link points to another page within Ilias. Select an object or a person and enter a meaningful link text:
[iln crs="1234567"]"link text"[/iln] -
An external link points to another Web site. Enter the URL at url="". Enter a meaningful link text:
[xln url="https://website.com"]"link text"[/xln] - This link will automatically point to the user's profile. The link text is the profile name.
-
An internal link points to another page within Ilias. Select an object or a person and enter a meaningful link text:
- Link texts are meaningful and reflect the aim and purpose. Download links contain the file format.
- The ScreenTip contains information about the destination of the link.
Link texts should provide information about where they lead and what purpose they serve. This makes it easier for users to assess whether they want to follow a link. The ScreenTip is displayed when the mouse pointer is over a link and provides further information about the link. Avoid vague formulations such as “Click here”.
Realization of the criteria
-
Context menu (right click) > Link
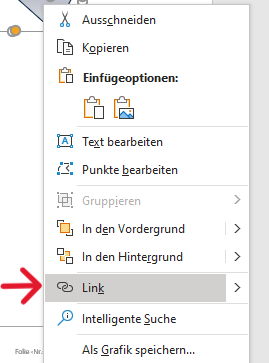
-
Text to display > enter link text; ScreenTip > Enter name and save
Additional Information
- Link texts are meaningful and reflect the destination and purpose; download links include the file format.
- Mouse click input on links can be canceled.
- The visible link text is part of the accessible name.
Blind users who move from link to link listen to the link texts. These should be as meaningful as possible and should convey where they lead. It is also important for voice control that visible labels are also included in the accessible names of controls so that they can be pronounced correctly.
Links should not be triggered when the mouse button is pressed, but only when it is released. This enables people with motor impairments to avoid incorrect inputs by moving the mouse. Similarly, people with motor impairments use primarly the keyboard as. For this purpose, the focus sequence should be traceable to ensure easy orientation.
Meaningful link text: Make sure your link text makes sense even without context. Avoid using vague text like "click here" or "read more". If links lead to content in other formats, such as PDF, this should also be included in the name.
                        <a href="https://example.com">
                        <img src="image.jpg" alt="Go to Example.com">
                        </a>
- Easily identifiable links: Links should be visually distinct from the surrounding text, and should change appearance when hovered over or focused.
- Avoid Using "#" as a href: Using `#` as a href can be confusing for screen reader users, as it doesn't provide any context about where the link will lead.
- Alternative Text for Image Links: If you're using an image as a link, make sure to provide alternative text that describes the link destination.
- Link texts are meaningful and reflect the destination and purpose; download links include the file format.
- Mouse click input on links can be canceled.
- The visible link text is part of the accessible name.
Blind users who move from link to link listen to the link texts. These should be as meaningful as possible and should convey where they lead. It is also important for voice control that visible labels are also included in the accessible names of controls so that they can be pronounced correctly.
Links should not be triggered when the mouse button is pressed, but only when it is released. This enables people with motor impairments to avoid incorrect inputs by moving the mouse. Similarly, people with motor impairments use primarly the keyboard as. For this purpose, the focus sequence should be traceable to ensure easy orientation.
Meaningful link text: Make sure your link text makes sense even without context. Avoid using vague text like "click here" or "read more". If links lead to content in other formats, such as PDF, this should also be included in the name.
Markup of Links
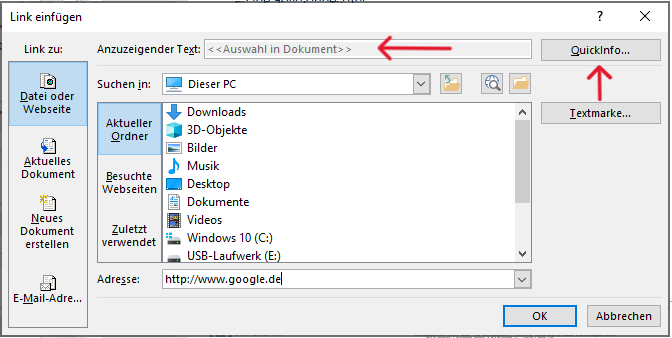
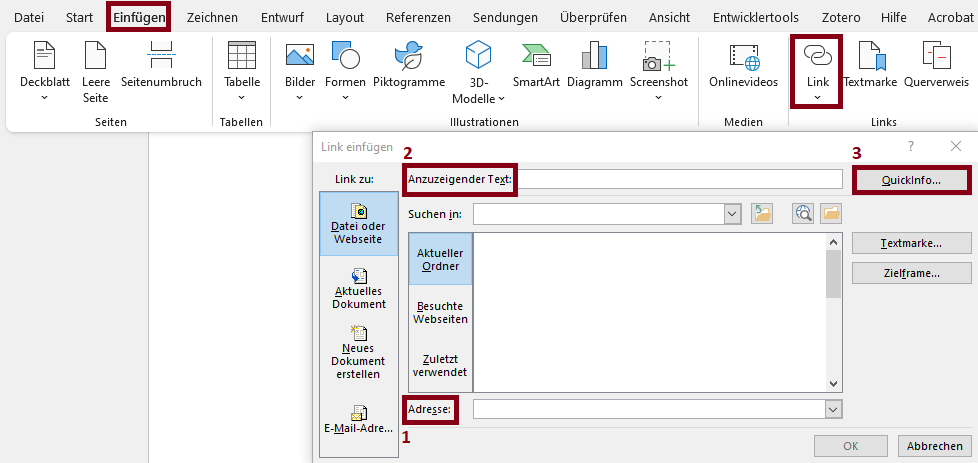
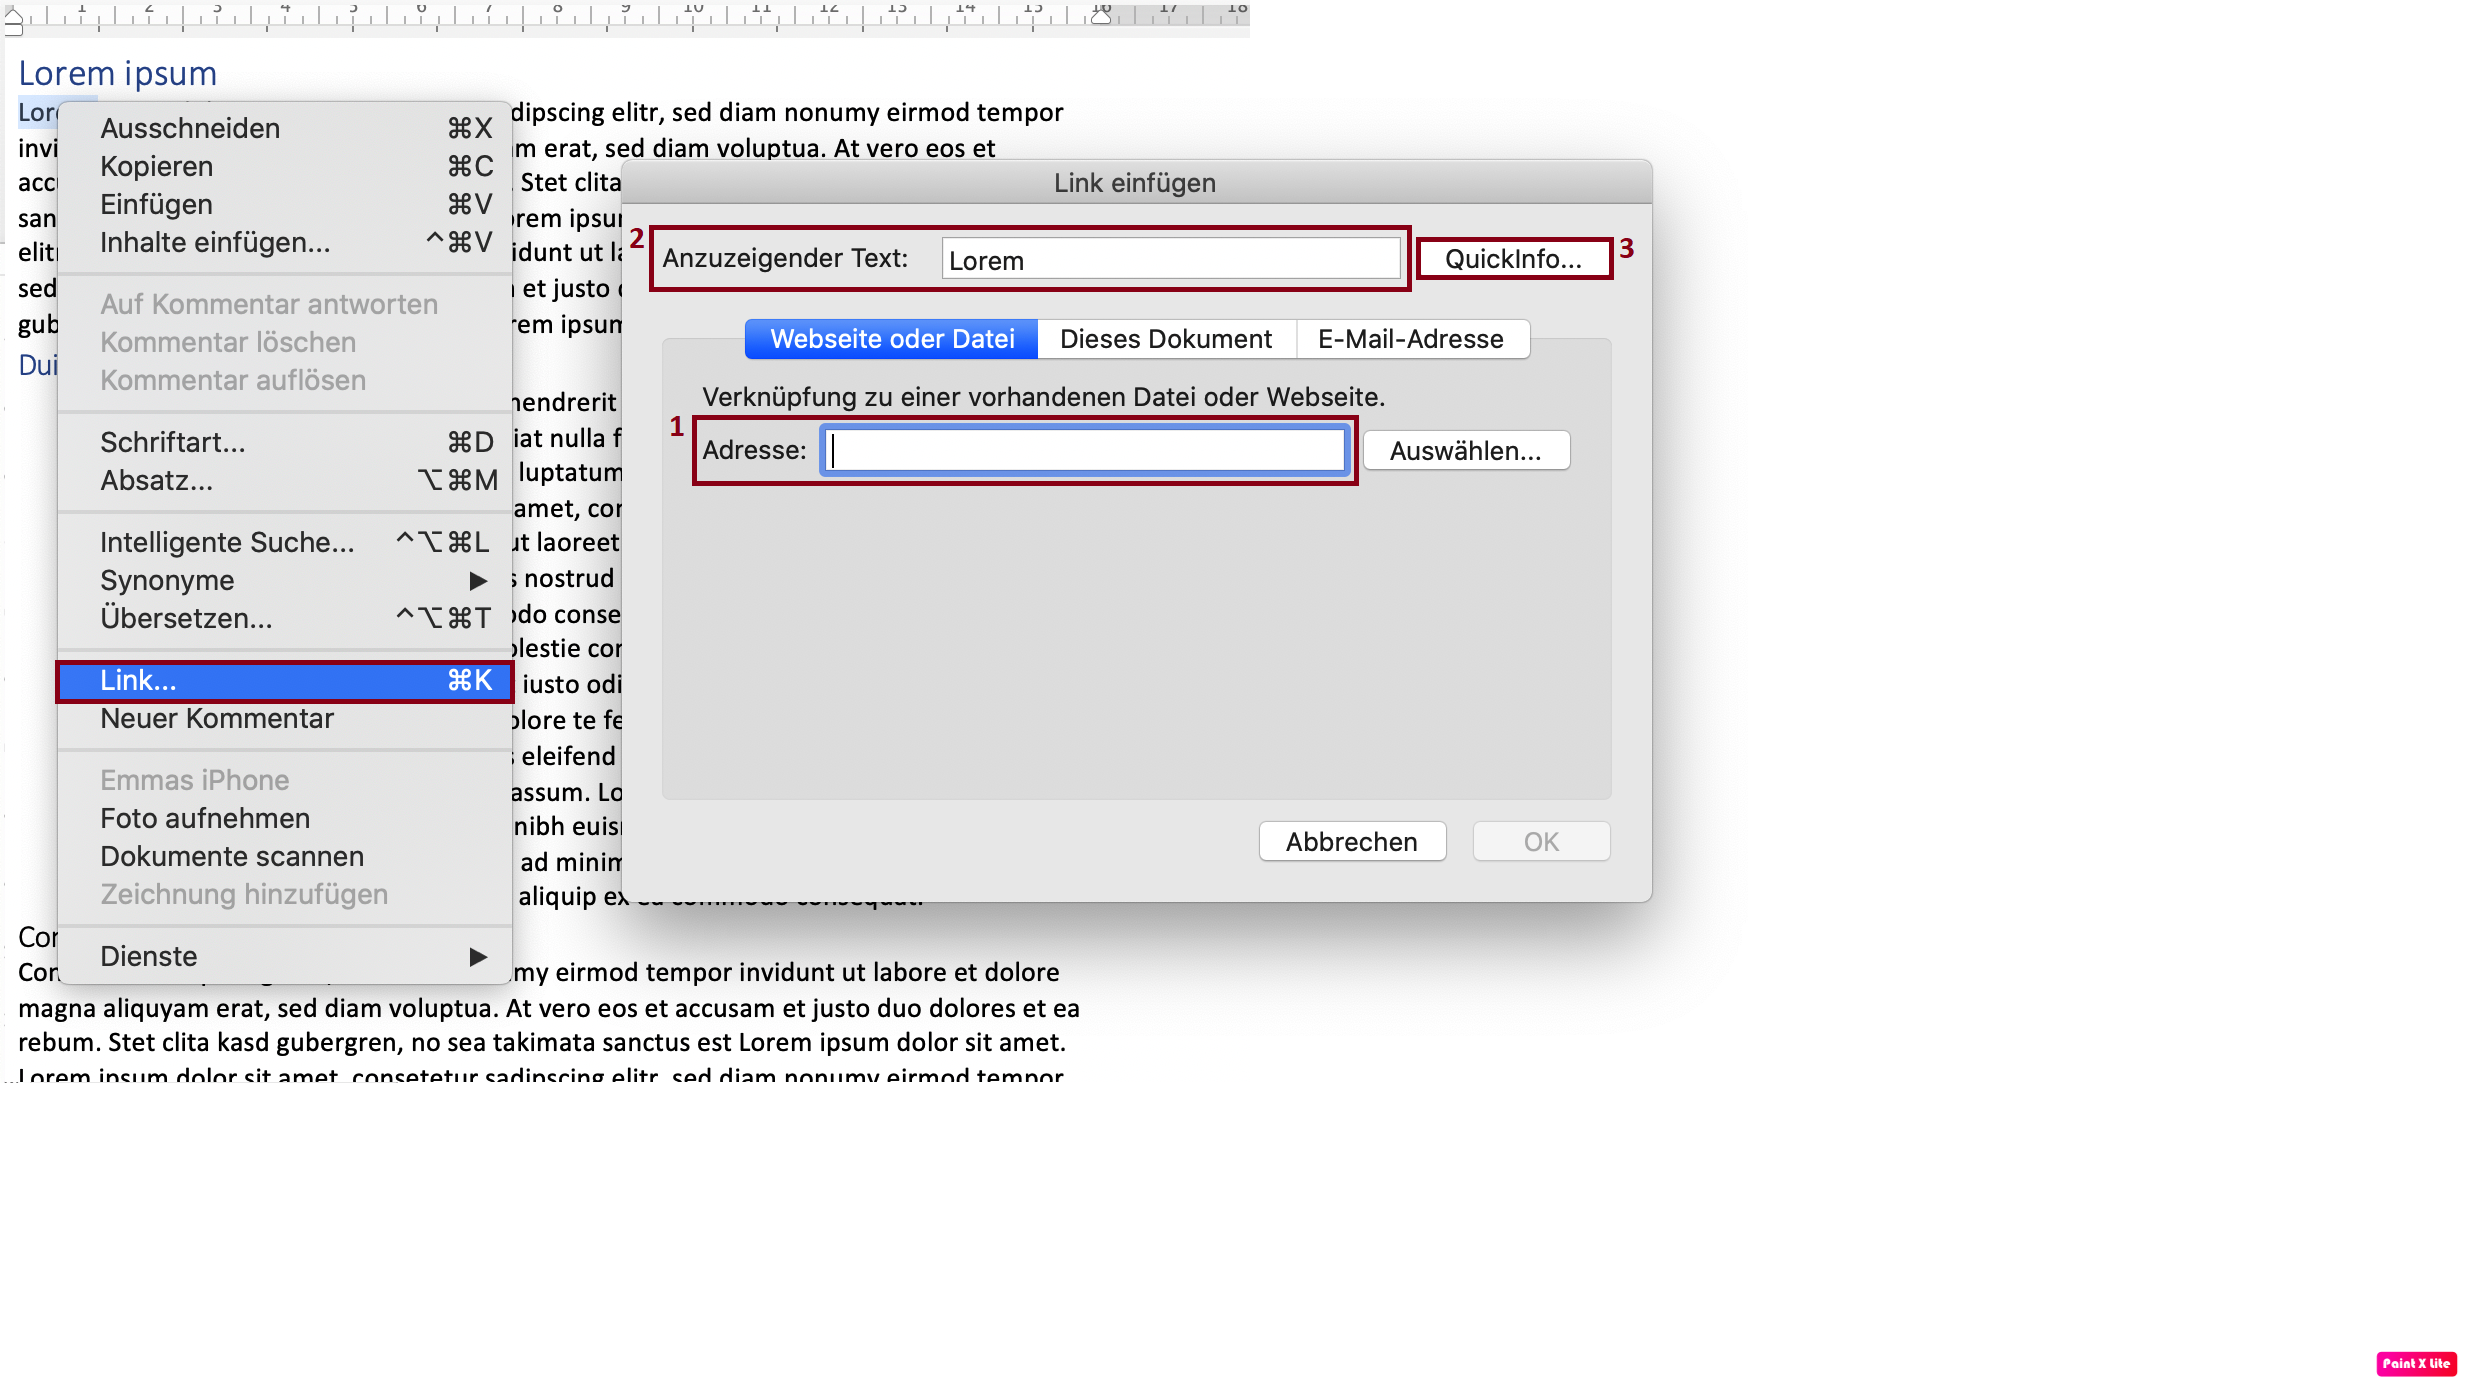
- Paste the URL under “Address”.
- Under “Text to display”, enter a clear label that should be displayed instead of the URL.
- Using “ScreenTip...”, you can set the alternative text for the hyperlink, such as the websites title. The visible link text should also be part of the ScreenTip.
- Paste the URL under “Address”.
- Under “Text to display”, enter a clear label that should be displayed instead of the URL.
- Using “ScreenTip...”, you can set the alternative text for the hyperlink, such as the websites title. The visible link text should also be part of the ScreenTip.
- Link texts are meaningful and reflect the destination and purpose; download links include the file format.
- Mouse click input on links can be canceled.
- The visible link text is part of the accessible name.
Blind users who move from link to link listen to the link texts. These should be as meaningful as possible and should convey where they lead. It is also important for voice control that visible labels are also included in the accessible names of controls so that they can be pronounced correctly.
Links should not be triggered when the mouse button is pressed, but only when it is released. This enables people with motor impairments to avoid incorrect inputs by moving the mouse. Similarly, people with motor impairments use primarly the keyboard as. For this purpose, the focus sequence should be traceable to ensure easy orientation.
Meaningful link text: Make sure your link text makes sense even without context. Avoid using vague text like "click here" or "read more". If links lead to content in other formats, such as PDF, this should also be included in the name.
Markup of Links
BITV-Guidelines
Formulas
Use existing style sheets or markup languages such as LaTeX to create formulas. This enables assistive technologies to output them correctly.
LaTeX: Further information and instructions can be found in the LaTeX-Tutorial (English) or LaTeX-Tutorial (German)
Insert formulas
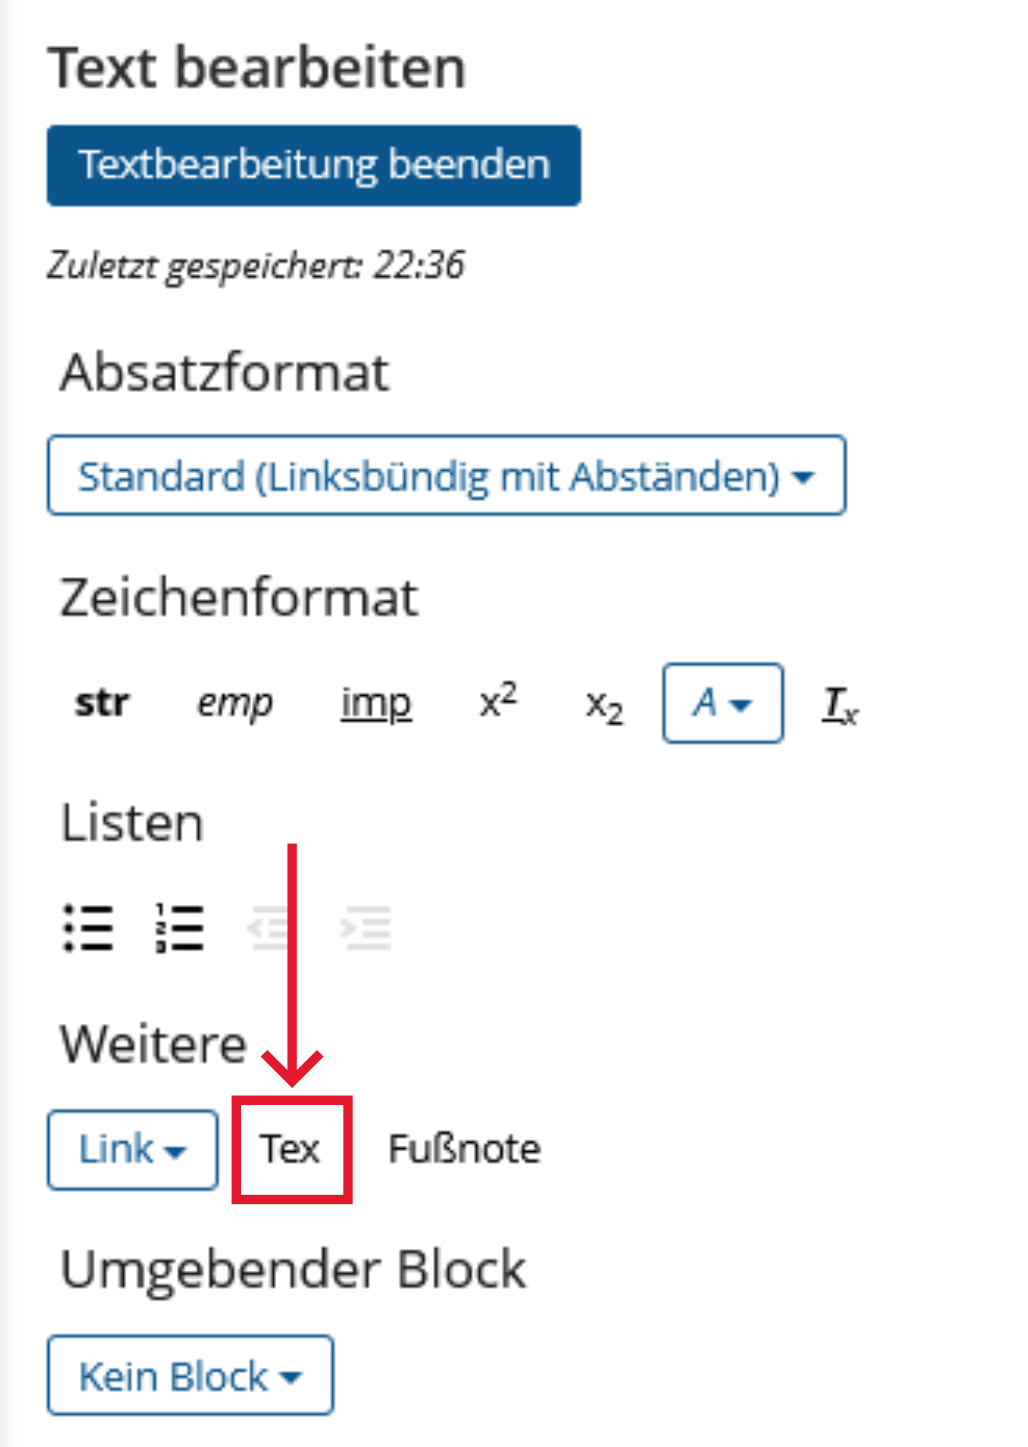
-
Click the plus sign and choose "Insert Text".
-
Under "More", click "Tex". Insert your equation between the [tex] and [/tex] tags.
Use existing format templates to create formulas. This enables assistive technologies to display them correctly.
Realization of the criteria
Menu bar: Insert > Symbols > Equation

Use existing style sheets or markup languages such as LaTeX to create formulas. This enables assistive technologies to output them correctly.
LaTeX: Further information and instructions can be found in the LaTeX-Tutorial (English) or LaTeX-Tutorial (German)
Microsoft Office: How to insert formulas in Word
Insert as image: Enter the LaTeX notation or a spoken variant of the formula in the alternative text, for example x² as “x to the power of two”.
Insert formulas
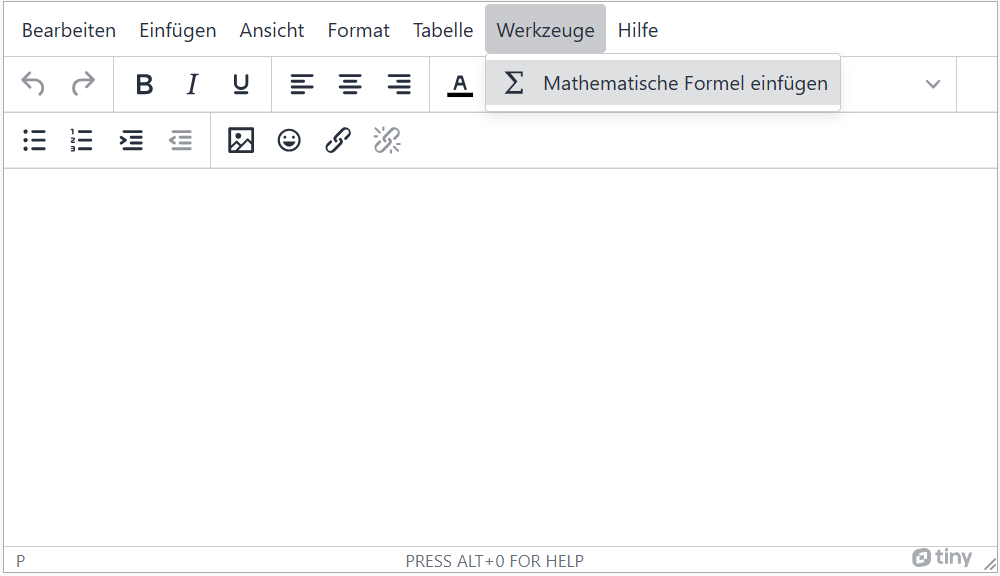
OPAL editor:
-
Select 'Tools' in the menu bar and then 'Insert mathematical formula'.
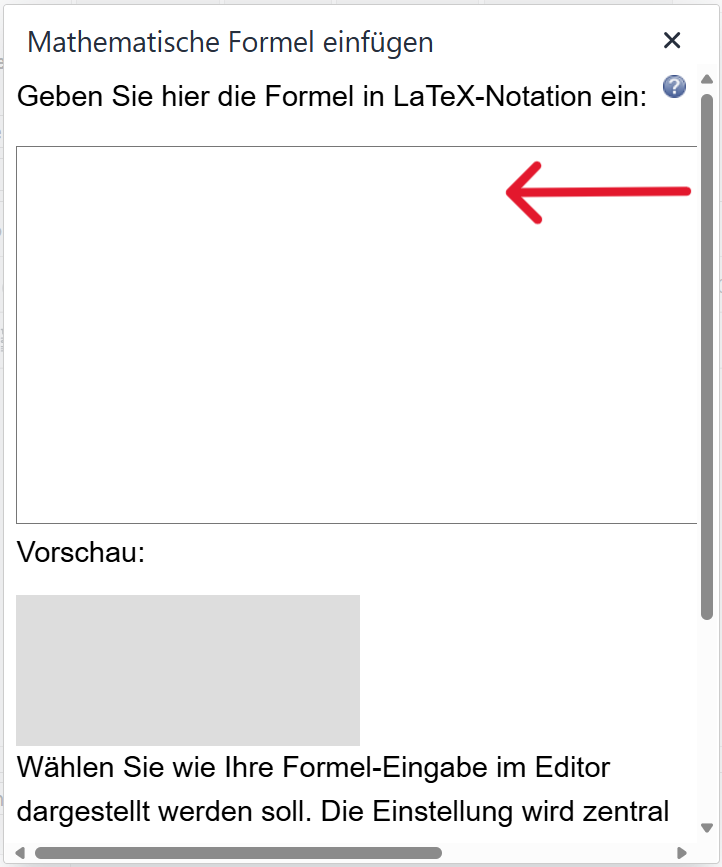
-
Enter the formula in LaTeX notation in the text field and then click on "Ok".
You can integrate MathML into your HTML code with the <math> tag. You can find more information on marking up formula components here: MathML/Beginner Tutorial
Markup of Formulas
HTML tags: <math>
            <math>
            <mi>a</mi><mo>+</mo><mi>b</mi>
            </math>


Alternatively, you can insert an image of the formula instead. In this case, put the LaTeX or MathML notation of the formula in the alternative text of the image.
Provide Text Alternatives: For complex mathematical formulas, it's important to provide a text explanation so that users who are blind or visually impaired can understand the formula.
Code
The following criteria are taken from the checklist:- Text-background contrast is sufficient: at least 4.5 : 1 for small font and 3 : 1 for large font.
Parts of the program code that are highlighted in color must also be easy to recognize for visually impaired people. Further information on this can be found in the entry for Colors .
Markup of Code
Criteria and Barriers of ILIAS
The download link does not contain the format of the file to be downloaded and is therefore not meaningful for blind people.
Barriers- With the specified programming language, some variables have links that search for explanations of them. However, the link texts do not contain any information about where they lead to and are therefore not meaningful.
- Although a foreign language can be selected, it is not marked for assistive technologies.
- In AULIS (ILIAS version 8.17) the color contrasts of colored highlights are insufficient.
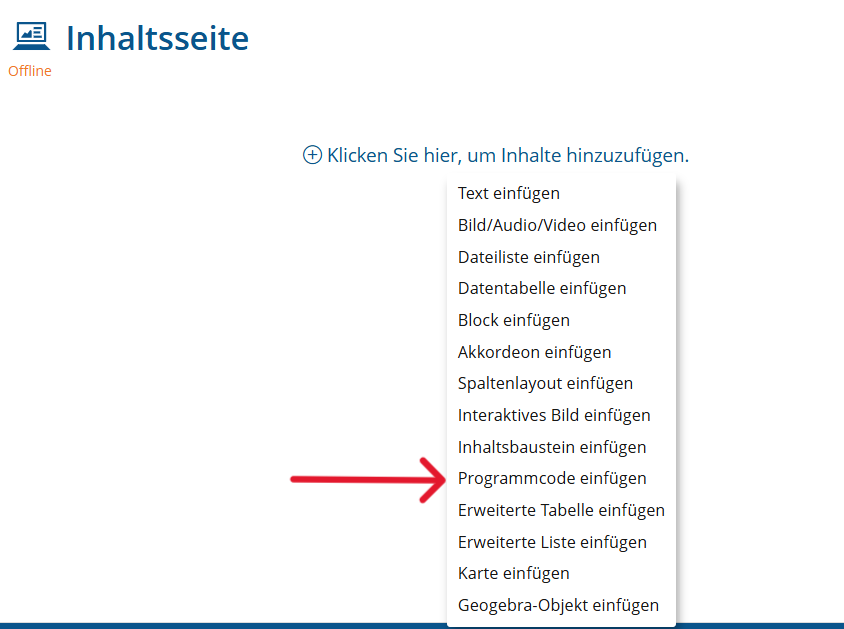
Create program code
-
Click on the plus sign and select "Insert program code"
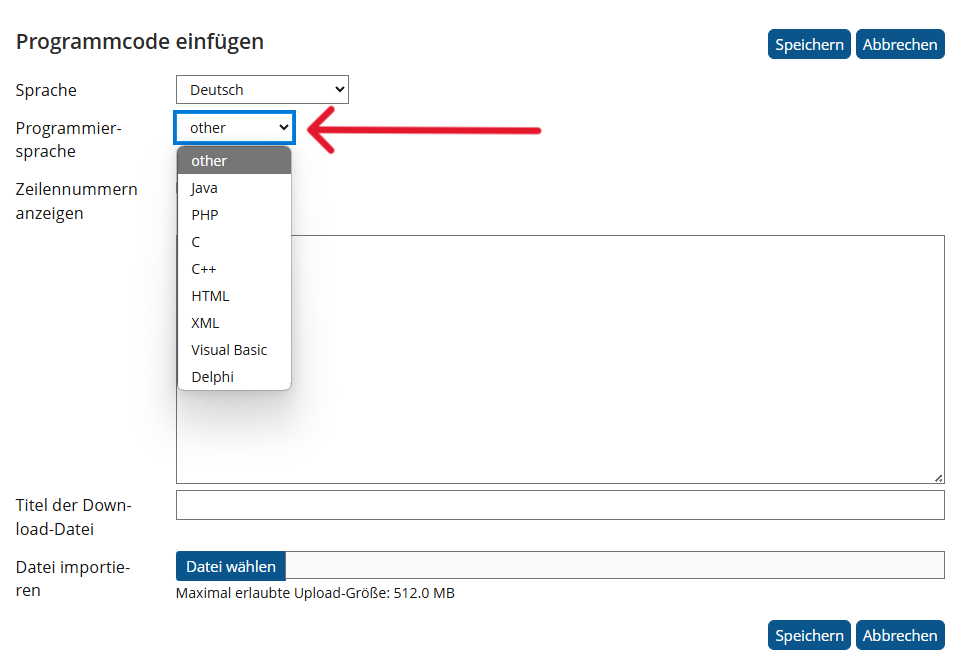
-
Wählen Sie "other" als Programmiersprache aus. Dadurch werden keine Links angezeigt, die nicht barrierefrei sind.
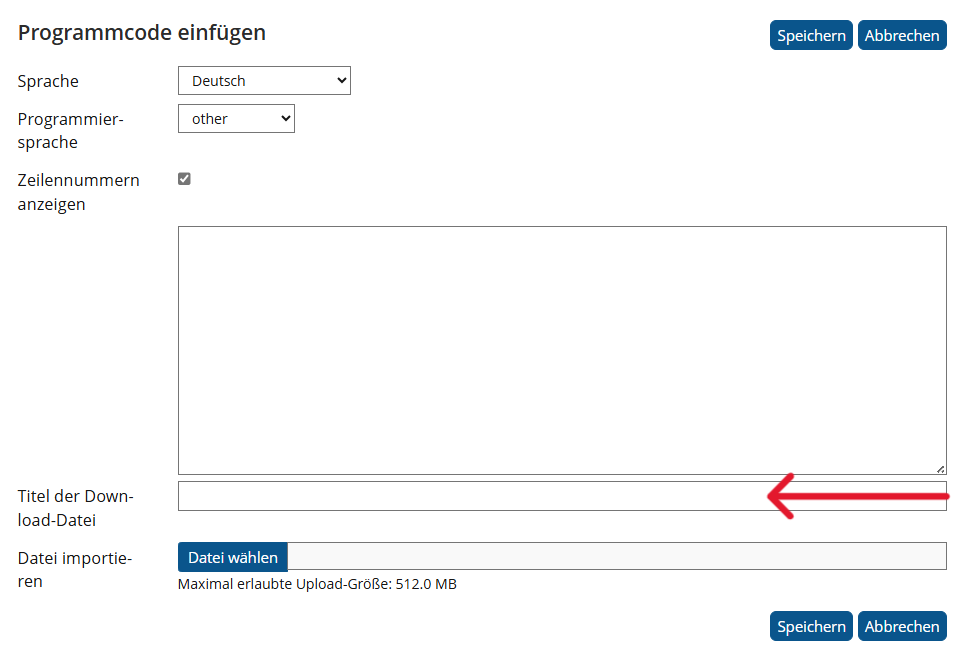
-
Lassen Sie den Titel für die Download-Datei leer. Damit wird der Programmcode nicht zum Herunterladen bereitgestellt und der nicht barrierefreie Download-Link nicht angezeigt wird.
            <pre>
            <code>
            class HelloWorld {
            public static void main(String args[]){
            System.out.println("Hello, World");
            }
            }
            </code>
            </pre>
Integration of custom HTML code
The following content can only be created with additional HTML code in OPAL. It can't be created in ILIAS.
The guide entry for marking up foreign-language text content already contains instructions on how to use the source code tool with which the additional HTML code can be inserted.
Form Fields
The following entry describes the implementation of accessible form fields in general, in relation to labels and error messages.
General Criteria for Form Fields
The following criteria are taken from the checklist:- For input fields that capture user data, a semantically unambiguous, language-independent determination of their purpose is possible.
- Entries on forms do not lead to unexpected context changes.
- Data entries can be undone or checked and corrected before sending. Successful entries are confirmed.
Input fields of forms should have labels that are linked to the input fields using the for attribute. In addition, related input fields should be grouped using <fieldset> or meaningful headings. This allows screen readers to display forms correctly regardless of the visible display.
Content changes on the page (for example, the display of additional fields) should always be clearly understandable, otherwise they can be distracting or confusing. They should also appear below the corresponding element so that screen readers can read this out next. If, for example, buttons change the language of the entire page or show additional content, there should be a note about this behavior beforehand.
In many cases, users with disabilities have a higher risk of making incorrect entries. It is therefore particularly important for ordering processes and mandatory transactions to offer mechanisms for undoing, checking or correcting entries. To implement this, all entries should be displayed again before submitting and only sent after confirmation. Alternatively, it must be possible to undo the process immediately after saving.
Code example for a form with multiple input fields
                          <fieldset>
                            <legend>Example form</legend>
                            <div>
                              <input type="radio" name="format" id="txt" value="txt" checked>
                              <label for="txt">Radio Button</label>
                            </div>
                            <div>
                              <input type="checkbox" name="newsletter" id="check_1">
                              <label for="check_1">Checkbox</label>
                            </div>
                          </fieldset>
                            <input type="checkbox" id="notification" name="notify" value="delays">
                            <label for="notification">Notify me of delays</label>
BITV-Guidelines
Error Messages from Form Fields
The following criteria are taken from the checklist:- The form generates error messages if incorrect entries are made.
- Incorrectly completed fields are identified and the error is described in text form.
- Error messages are easy to understand and provide information on how to correct errors.
Incorrectly completed fields should be highlighted and labels with the specific errors should be displayed. This makes it easier for users to correct errors. To ensure that error messages are also accessible to screen readers, they should be provided via live regions (aria-live) or notifications (alertdialog).
The errors are recognized. Mandatory fields can be labeled with aria-required=“true”. Error messages that are not a label of an input field are linked to the corresponding input field via aria-describedby.
Error messages provide specific instructions on how to correct errors. If an incorrect format is specified for email addresses or data, an example format should be provided. However, for security reasons, error messages for passwords and login fields must not contain any specific information.
Code example of a mandatory field with reference to the expected format
            <label for="date">Date (dd-mm-yyyy)</label >
            <input type="text" name="date" id="date" aria-required="true">
BITV-Guidelines
User-Customized Elements
This section refers to features or functionalities that can be created with user-customized elements. These features may require the use of custom HTML files or learning modules such as SCORM, CP, etc. Here are some explanations of these features:
Time-based Content
The following criteria are taken from the checklist:- Time limits can be turned off or extended.
- Distraction from blinking or moving elements is avoided, limited to 5 seconds, or can be disabled.
- The page contains no elements that blink more than three times in a one-second period.
Elements in this category have time limits or change over a certain period of time. This can make it difficult for people with visual or cognitive impairments to understand the content. Flickering elements can also cause epileptic seizures. Accordingly, there should be buttons with which time limits can be switched off or greatly extended.
BITV-Guidelines
Dynamic Content
The following criteria are taken from the checklist:- Hidden content is also hidden for screen readers.
- If the keyboard focus can be moved to an element on the page, it can also be moved away from this element again.
- When a component of the page receives keyboard focus, it does not lead to an unexpected context change (such as pop-up windows or automatic submission of forms).
- If additional content appears on hover, users can move the pointer over this content without it disappearing. The content is closable without shifting keyboard focus, and the content will not close automatically after a certain period.
- When a status message appears, the screen reader will read it out without shifting focus to the message.
If elements receive the focus (e.g. via the tab key), their function should only be triggered after additional confirmation. Otherwise, suddenly appearing elements can be confusing. To achieve this, programmed functions should be triggered on activate and not on focus. In addition, every element must be accessible and leaveable via the keyboard so that they are also accessible for people with motor or visual impairments.
If content is displayed, it must not disappear again after a certain time. Visually impaired users often need more time to take in all the content. In addition, they sometimes use a high zoom magnification. Therefore, all displayed content must be explorable with the mouse (on which the focus of the magnification lies) without disappearing. In addition, it must be possible to close displayed elements using the escape key or the activating element so that the focus is not shifted elsewhere.
Status messages are dynamically added messages, for example about errors or successful actions. These must be marked with the role attribute so that they are also accessible to screen readers.
Mark up of Status Messages
- Success message: role="status" aria-atomic="true"
- Notice or warning message: role="alert" aria-atomic="true"
- Progress message: role="log"
BITV-Guidelines
Input Methods
The following criteria are taken from the checklist:- In image-based CAPTCHAs, the alternative text of the image describes the purpose of the CAPTCHA and indicates how to find a non-image-based alternative.
- For complex pointer gestures, there are alternatives for activation using a simple pointer input.
- Keyboard shortcuts via individual keys can be switched off or changed by the user.
- There are alternative input options for motion input, or motion input can be turned off.
Explanations of the terminology can be found here. For information on barrier-free implementation, please refer to the respective BITV guidelines.
CAPTCHAs
are a security measure designed to prevent bots or automated software from performing certain actions. It typically requires users to input text presented in an image or audio, or solve a simple problem, to prove they are human.
Complex pointer gestures
refers to complex gestures that require the use of a mouse or other pointer devices, such as drag and drop or multi-touch.
Keyboard Shortcuts via Individual Keys
refers to functionalities that can be triggered by keyboard shortcuts via individual keys. For example, there might be a shortcut to navigate directly to a certain part of a website or trigger a specific action.
Motion activation
refers to functionalities that are triggered by the movement of a device or the user's physical movement, such as shaking a mobile device.