Post-Processing with Adobe Acrobat Pro
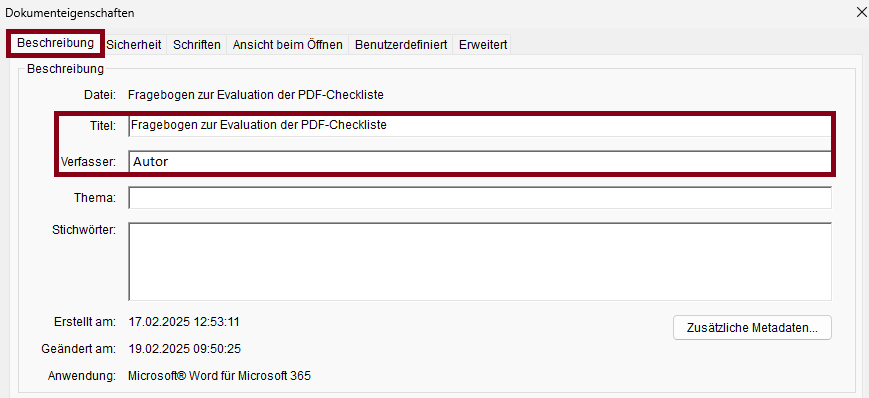
Set Document Title/Author
The following criteria are taken from the checklist:- The document has a suitable document title, which is set in the metadata and is displayed when the document is opened.
- The author of the document is set.
Set PDF/UA Identifier
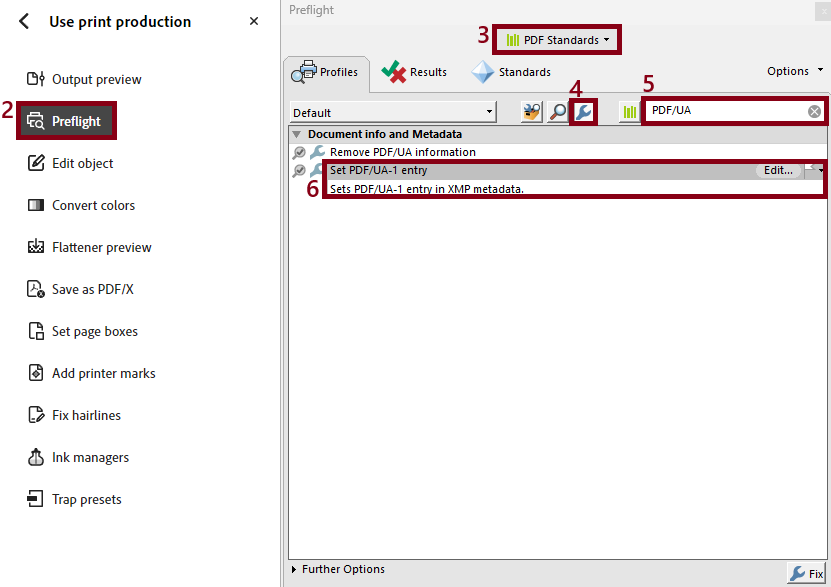
The following criteria are taken from the checklist:- The PDF/UA identifier is set in the metadata.
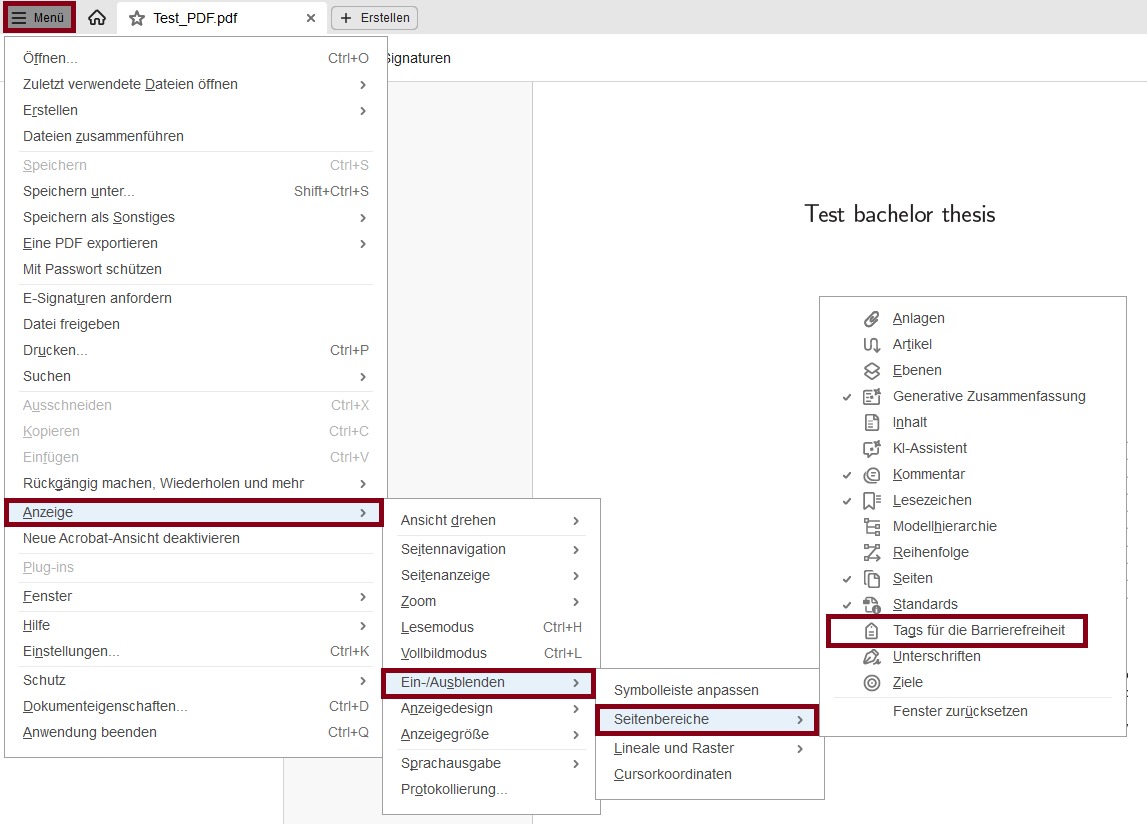
- Under “All tools”, navigate to “Use print production”.
- Select “Preflight”.
- Select “PDF Standards” from the dropdown box.
- Select the Wrench Symbol.
- Search for “PDF/UA” in the search bar.
- Select “Set PDF/UA-1 entry”.
- Click “Fix”.
Open „Tag“-Menu
Acrobat Pro 2017:
View > Show/Hide > Navigation Panes > Tags
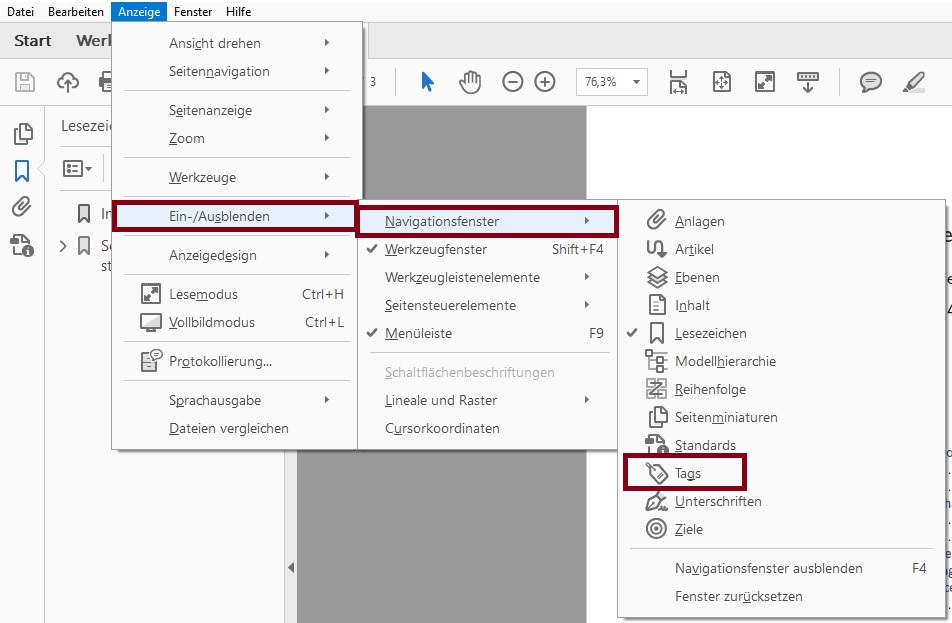
Acrobat Pro 2024:
Menu: View > Show/Hide > Side panels > Accessibility Tags
Create Tag-Structure
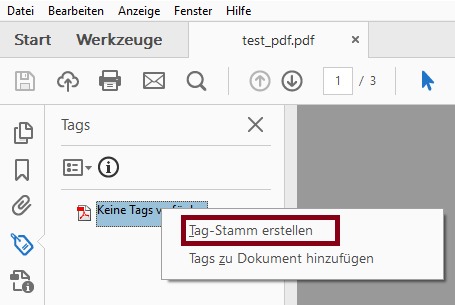
- Display the “Tags” navigation window.
- Right-click the text “No Tags avaible”.
- Select “Create Tags Root”.
- The text “No Tags available” has changed to “Tags”.
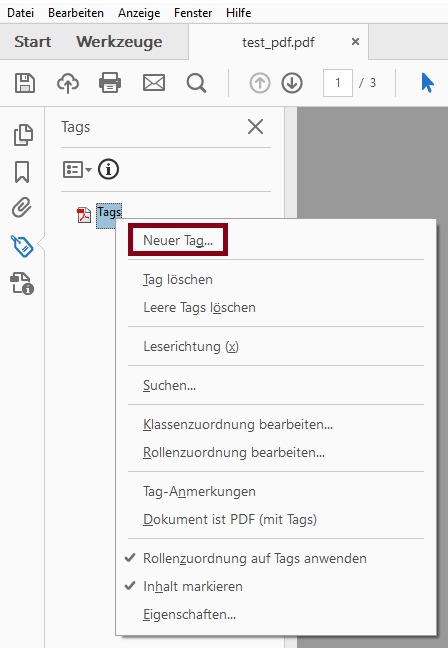
- Right-click on “Tags” and select “Document is Tagged PDF” to mark the document as tagged.
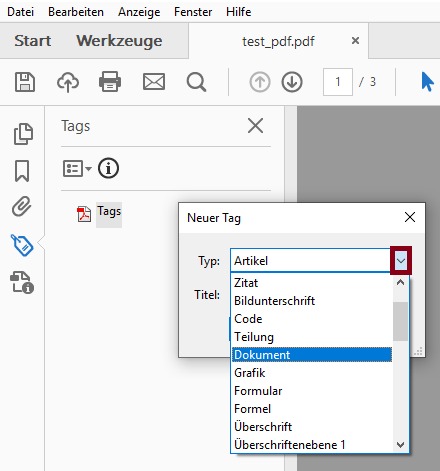
- Create the <Document> tag as the root element by right-clicking on “Tags”. Select “New Tag...” and pick Document in the Type Dropdown menu.
Tag Automatically
Acrobat Pro 2017:
While Acrobat Pro allows for automatic tagging, it cannot guarantee that all content will be tagged correctly. Therefore, it is important to manually review the automatically generated tags and correct them if necessary.
- Open the “Accessibility” tool from the “Tools” pane.
- Select “Auto Tag Document”.
- Review the automatically created tags in the “Tags” navigation pane.
Acrobat Pro 2024:
While Acrobat Pro allows for automatic tagging, it cannot guarantee that all content will be tagged correctly. Therefore, it is important to manually review the automatically generated tags and correct them if necessary.
- Under “All tools,” click “View more” and select the “Prepare for accessibility” tool.
- Select “Automatically tag PDF”.
- Review the automatically created tags in the “Tags” navigation pane.
Tag Manually
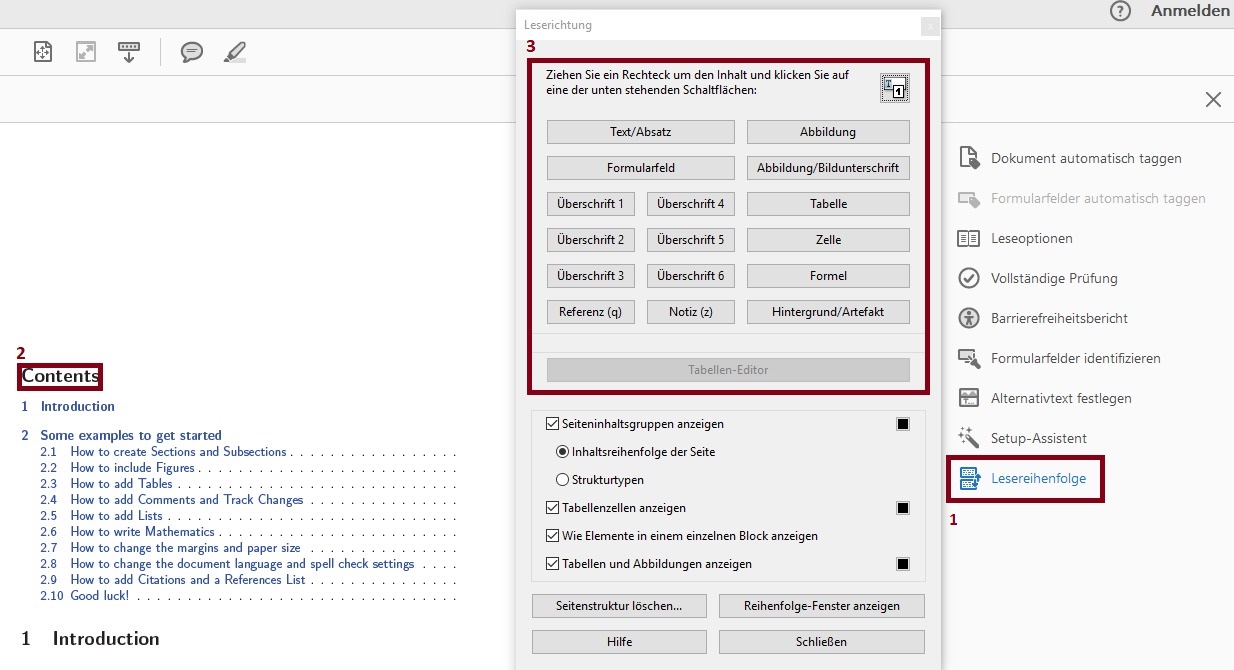
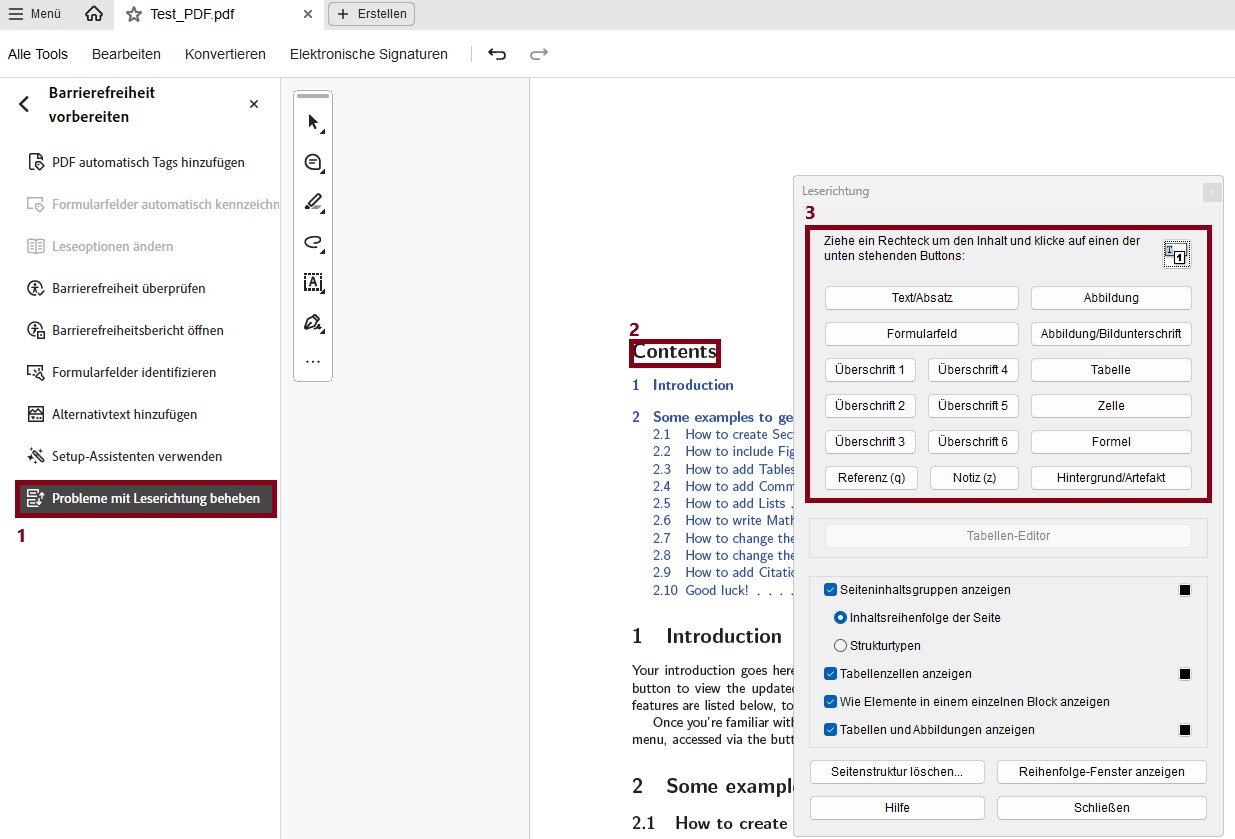
One option for manually creating tags is to use the “Reading Order” tool. However, not all tags are available by default, so manuell adjustments may be necessary.
Acrobat Pro 2017:
- Select “Reading Order” within the “Accessibility” tool
- Once the reading order window is open, draw a rectangle around the content you want to tag.
- Select the tag that matches your selection.
- Repeat steps 2 and 3 until the entire document is tagged.
Acrobat Pro 2024:
- Select “Fix reading order” within the “Prepare for accessibility” tool
- Once the reading order window is open, draw a rectangle around the content you want to tag.
- Select the tag that matches your selection.
- Repeat steps 2 and 3 until the entire document is tagged.
Change Tags
Solution 1:
- Display the “Tags” navigation window.
- Click on the affected tag in the navigation window once to select it.
- Click on the tag again to rename it.
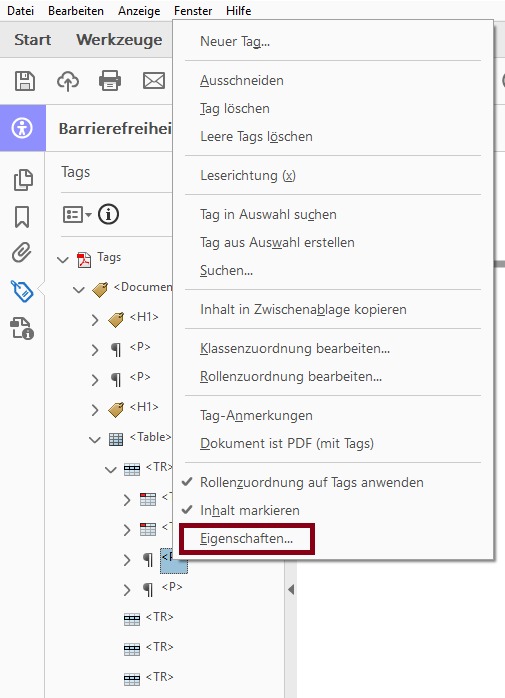
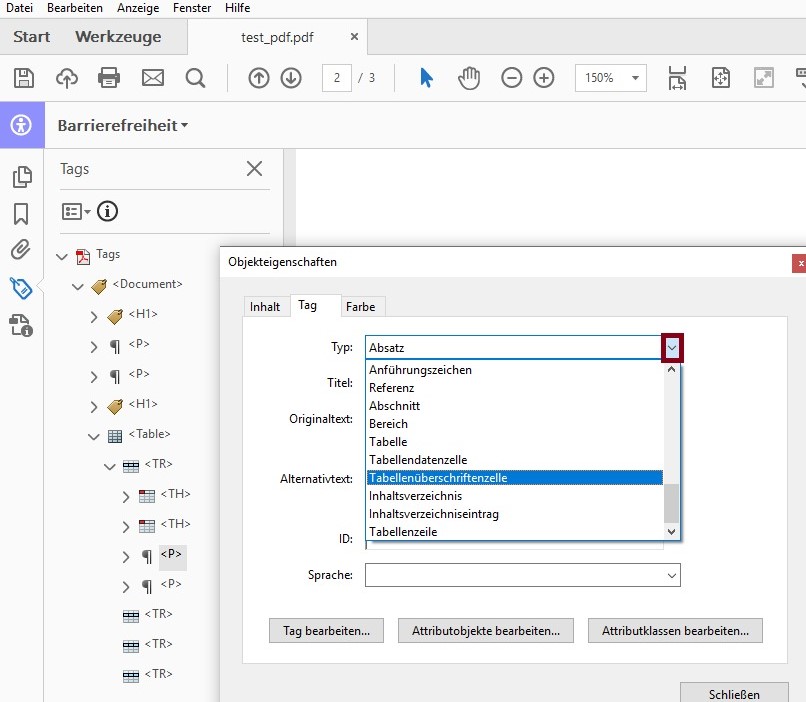
Solution 2:
- Display the “Tags” navigation window.
- Right-click on the affected tag and select “Properties...”.
- In the Tab “Tag” select thep proper tag in the Dropdown menu.
- Click “Close”.
Attention: The tag must be written correctly in English. See:
(Webseite: Barrierefreies PDF: „Übersicht der PDF-Tags“)
Example PDF Tags
Tags allow the content of a PDF document to be logically structured without changing its visual appearance. They are essential for assistive technologies such as screen readers because they affect the following aspects:
- The order in which content is presented via the speech output or Braille display of assistive technology.
- The semantic meaning of elements, such as headings, lists, or tables, so that screen readers can correctly interpret and display the content.
Paragraphs
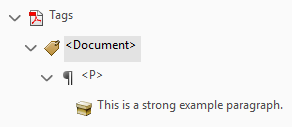
This is a strong example paragraph.
Headings
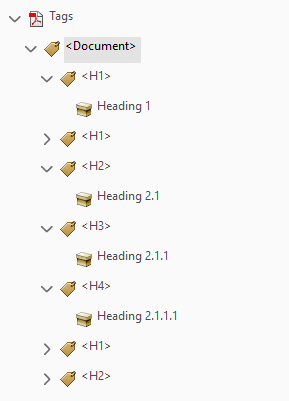
- Heading 1
- Heading 2
- Heading 2.1
- Heading 2.1.1
- Heading 2.1.1.1
- Heading 3
- Heading 3.1
Table of Contents
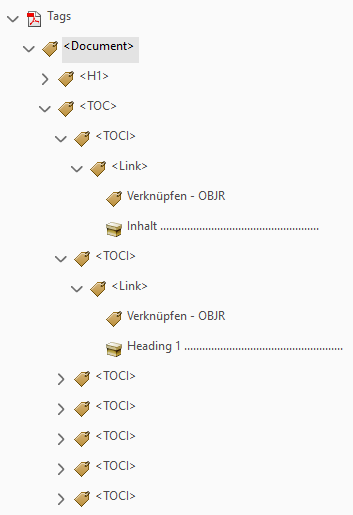
Contents
- Contents ……………………………………….............1
- Heading 1………………………………………....1
- Heading 2………………………………………....2
- Heading 2.1 …………….…………........2
- Heading 2.1.1 …………..……..3
- Heading 2.1.1.1 …......5
- Heading 3………………………………………....6
- Heading 3.1 …………….…………........6
The table of contents must have a <TOC> tag in which the individual headings are located.
The headings are inside a <TOCI> tag.
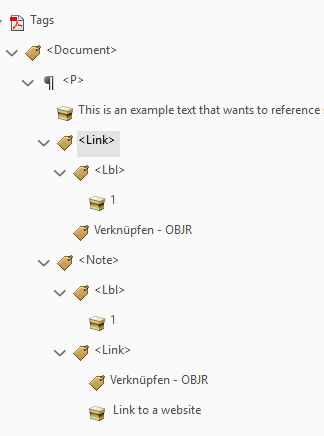
For a linked table of contents: The link is contained in a <Link> tag.
For numbered headings: The numbering is contained in a <Lbl> tag.
Dots between the chapter heading and the page number can be marked as artifacts.
Lists
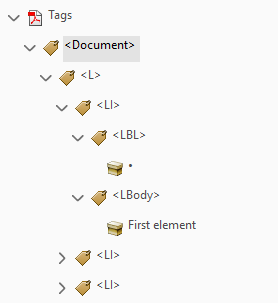 Nested Lists
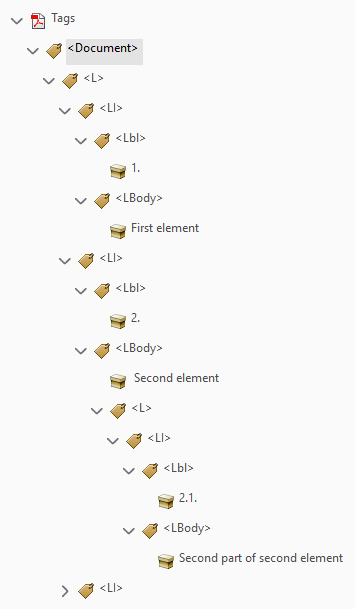
- First element
- Second element
- Third element
- First element
-
Second element
- Second part of second element
- Third element
The list must have an <L> tag that contains all elements of the list.
Each list element is inside a <LI> tag.
Each bullet is inside a <Lbl> tag.
The content of the enumeration is contained in an <LBody> tag.
For nested lists:
A new <L> tag is inside the <LBody> tag.
Each nested list element is inside a <LI> tag.
Each bullet is inside a <Lbl> tag.
The content of the enumeration is inside an <LBody> tag.
Quotes
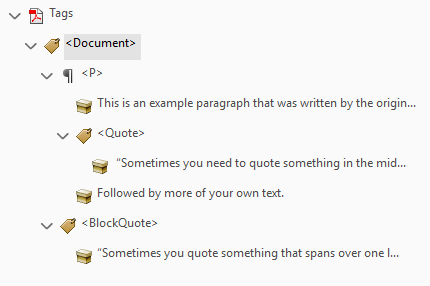
This is an example paragraph that was written by the original author.
“Sometimes you need to quote something in the middle of your paragraph”.
Followed by more of your own text.
“Sometimes you quote something that spans over one line and is not bracketed by your own thoughts.”
The <Quote> tag is used for quotes that are part of the continuous text and are surrounded by other text content.
The <Bockquote> tag is used for quotes that are presented as a standalone paragraph and may contain multiple sentences.
Tables
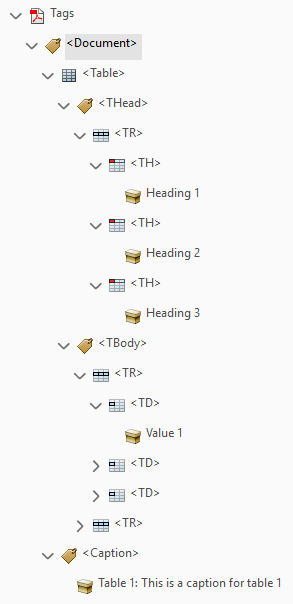
| Heading 1 | Heading 2 | Heading 3 |
|---|---|---|
| Value 1 | Value 2 | Value 3 |
| Value 4 | Value 5 | Value 6 |
The table must have a <Table> tag that contains all table rows and cells.
Optional:
The table header, body and footer can be structured using <THead>, <TBody> and <TFoot> tags.
Each table row is represented by a <TR> tag.
The content of each table cell is inside a <TD> tag and the content of each header cell is contained in a <TH> tag and is subordinate to the correct table row.
The table caption is located in a <Caption> tag directly above or below the table.
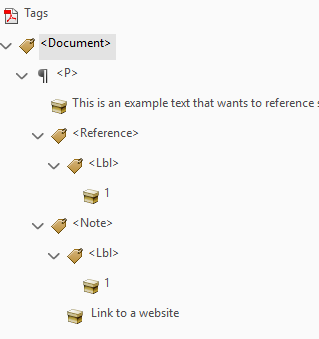
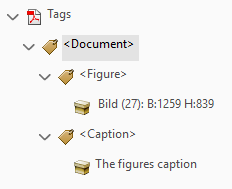
Images
Linked Images
 Missing Bounding Box
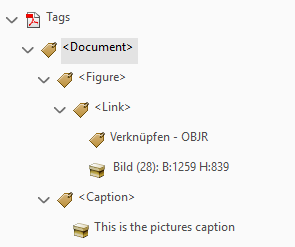
The image is inside a <Figure> tag.
The caption is located in a <Caption> tag directly above or below the image.
Linked Images
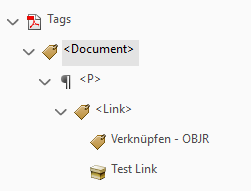
If the image is used as a link, a <Link> tag must be added within the <Figure> element.
Documents created in Microsoft Word experience an issue where no bounding box is applied to images. To resolve this, follow these steps:
- Important! Any previously created alternative texts will be lost and must be re-added afterwards!
- Click “Fix reading order” within the Prepare for accessibility tool.
- Hold down the left mouse button and drag a rectangle around the image.
- Click on “Image” within the “Reading Order” window.
If you place an image as the only element in a row, additional changes must be made to ensure correct tag usage.
- Right-click the <Figure> tag in the Acrobat Pro „Tag“ window.
- Click on “Properties...”.
- In the „Object Properties“ window, under „Tag“, click „Edit Attribute Objects...“.
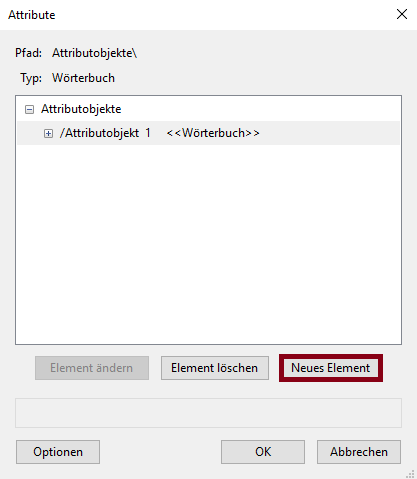
- If under „Attribute Objects“ is no entry called „/Attribute Object 1 <<Dictionary>>“ click on „New Item“.
- Select the entry called „/Attribute Object 1 <<Dictionary>>“ and click „New Item“.
- Add „Placement“ in the „Key:“ field and „Block“ in the „Value:“ field. Leave „Name“ as „Value Type:“ and click „OK“.

Links
Formulas
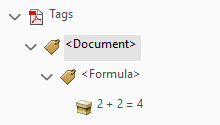
Formulas as Block Elements
The mathematical formula is inside a <Formula> tag.
Formulas as Block Elements
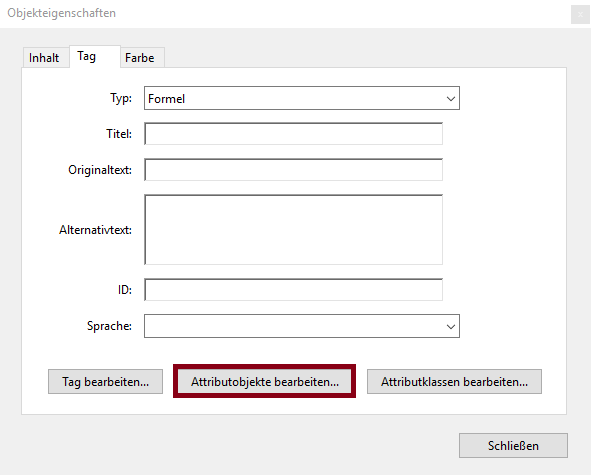
If you place a formula as the only element in a row, additional changes must be made to ensure correct tag usage.
- Right-click the <Formula> tag in the Acrobat Pro „Tag“ window.
- Click on “Properties...”.
- In the „Object Properties“ window, under „Tag“, click „Edit Attribute Objects...“.
- If under „Attribute Objects“ is no entry called „/Attribute Object 1 <<Dictionary>>“ click on „New Item“.
- Select the entry called „/Attribute Object 1 <<Dictionary>>“ and click „New Item“.
- Add „Placement“ in the „Key:“ field and „Block“ in the „Value:“ field. Leave „Name“ as „Value Type:“ and click „OK“.
Linked Footnote
 Footnote